All-in-One College Application Tracking Spreadsheet to Ace College Apps
If you’re a high school student getting ready to start the college application process, you’re probably already familiar with how overwhelming the process can be. From building a college list to writing seemingly endless essays (some schools have upwards of 8 supplemental essays…) to getting recommendation letters… the list goes on and on.
As a student who went through the college application process not very long ago, I remember the hectic months spent preparing and organizing all my application materials all too well. If there’s one thing I’ve learned, however, it’s that creating a college application tracking spreadsheet to organize all your materials and deadlines is essential.
If you don’t use a tool to organize all your applications, you might end up missing deadlines or forgetting to submit something altogether. (In senior year, I heard various horror stories from classmates about forgetting to apply to a certain program or having to cobble together additional materials half an hour before the deadline.)

However, if you do have an organization tool, you can save yourself from lots of stress and chaos—which, trust me, you do not want more of on top of senior year coursework, extracurriculars, and the inevitable pressure of awaiting college decisions.
In this post, I’ll be covering a step-by-step guide to creating a college application tracking tool that will help you:
- Streamline college research for building a college list
- Seamlessly track materials and deadlines for applications
- Organize all essays in a central location
Let’s jump in!
Step 1: Choose a Platform
The first step in creating a college application tracking spreadsheet is selecting a platform. Below, I’ve listed several options and some advantages and disadvantages:
Microsoft Excel
Excel can be a powerful tool for creating a college application tracking system. You can set up columns to track application details such as college name, deadlines, application status, and notes.
However, it lacks the visual appeal and flexibility of other tools, and collaboration can be challenging when multiple people need access to the spreadsheet simultaneously.
Google Sheets
If you’re used to using Google Drive, Google Sheets is a good cloud-based option for tracking college applications. With Google Sheets, you’ll be able to access your tracker anywhere. Also, it provides collaboration features, so multiple users can edit the same spreadsheet simultaneously.
However, like Excel, it has limitations in terms of organization and visual aesthetics compared to more specialized tools like…
Notion
Notion is an all-in-one workspace that can be used to create a comprehensive college application tracking system. I currently use Notion to plan and organize almost everything in my life (tracking deadlines, planning long-term projects, setting goals, tracking habits, and more).
I’ll be going more in detail about why Notion is my preferred tool for organization later in this article. However, for now, here’s a quick preview of features that will streamline your planning and organization:
Visual Appeal and Versatile Formatting Options
Notion is very aesthetic, and you can display information in various ways for easier readability with a few simple clicks.
Integration of Attachments, Notes, and Cross-Referencing Capabilities
This may sound confusing now but don’t worry—I’ll cover this more in-depth later. The basic idea is that Notion enables you to attach materials (like essay drafts, resumés, and even supplemental portfolio videos) directly in your workspace.
That way, you can organize all your materials for each application in one place! This is something you can’t do with either Excel or Google Spreadsheets—with these tools, you need to constantly switch back and forth between different documents and your spreadsheet tracker, which can get confusing.
Mobile Accessibility
Notion provides a mobile app that you can access on your phone! While Excel is inaccessible and Google Spreadsheets is difficult to read on a mobile device, Notion’s interface is mobile-responsive.
Reminders
You can set reminders for application deadlines directly in Notion. That way, you’ll get automatic notifications on your devices instead of having to pull up the tracker to check upcoming deadlines every time!
Step 2: Create a College Research Template
Once you’ve chosen a tool to organize your college applications, you need to create a college research template. Creating a template will help you look for key features of each college and keep all your research materials organized in one place.
When you need to build your college list, you can scan the template to compare and contrast different colleges, instead of having to switch between scattered notes and documents.
Resources for College Research
Not sure where to get started on college research? Here are some websites that provide college search tools:
- College Board’s BigFuture: You can find detailed college profiles with information on admission statistics, financial aid information, and virtual campus tours.
- Naviance: You might already be familiar with this platform if your high school uses it. It offers college search tools, career assessments, scholarship information, and application tracking.
- Niche: This is a great place to look for college rankings, reviews, and insights from current students. You can get details on things like academics, campus life, and student satisfaction.
- U.S. News & World Report’s Best Colleges: If you’re looking for rankings of colleges and universities with specific programs (or just in general), this is a reliable source. Rankings are based on various factors such as academic reputation, graduation rates, and student-faculty ratio.
- College Confidential: This is an online community where students, parents, and college admissions experts share advice and experiences related to college admissions and specific universities.
- Cappex: You can find tools to search for colleges, assess your chances of admission (but always take these with a grain of salt… or more), and explore scholarship opportunities. It also provides student reviews and personalized recommendations.
- Princeton Review: This is a great resource for college rankings, student reviews, and detailed profiles of colleges. You can also find test preparation resources and guidance on college admissions.
- Unigo: You can find college reviews, student ratings, and insights into campus life. It also provides scholarship information and college-matching tools.
- College Navigator: This is an online tool by the National Center for Education Statistics (NCES) that allows you to search for colleges based on criteria, including location, program offerings, and accreditation.
Creating Your Template
To create your college application tracking spreadsheet, you should label each row as a college and each column as a characteristic. Characteristics that you should look for include, but are not limited to:
General Overview
- Location
- Undergraduate population
- Acceptance rate
- Estimated cost
- Difficulty level (safety, match, or reach)
Other Considerations
- Distance from home
- Interesting programs and opportunities
- Whether the college takes demonstrated interest* into account in the admissions process (demonstrated interest includes, but is not limited to, things like doing a campus tour, opening emails, and attending an information session)
- Average stats of the admitted student body (things like GPA and SAT/ACT score)
- Suitable extracurriculars
- Job/grad school placement rate
*I recommend adding a column in your spreadsheet titled “Demonstrated Interest” and checkboxes beneath. Next to that, you should create a column titled “DI Action Items”. If a college considers demonstrated interest, you should add a short list of things you intend to do to demonstrate interest.

In Google Sheets, click on Insert in the top menu and select the Dropdown option to add dropdowns like the one you see in the Difficulty Level column.
Step 3: Create an Application Checklist
After doing your college research and using your research to build a college list, it’s time to start organizing the materials you’ll submit. Since different schools have different deadlines, it’s essential to keep track of all the deadlines in one place.
To do so, add another sheet to the same spreadsheet you used to do your college research. (This way, you can keep all college application-related organization in one file.) Title it “Application Checklist”.
Labeling the Rows and Columns
In this sheet, label each row with the name of a college you want to apply to. Then, label the columns with the materials you need to submit. Here are the main columns you should add (you may need additional columns, depending on the required materials for the colleges you apply to):
- First quarter transcript
- Mid-year transcript
- Recommendation letters
- Test scores (AP/SAT/ACT/IB or other): a quick note here—you can create separate columns for each test score if you don’t intend to send every test score to every college you apply to
- Extended resumé
- Supplemental materials (e.g., an arts/research/writing portfolio, additional letters of recommendation)
- Portal link
- Application deadline
Customizing the Spreadsheet
Once you have your rows and columns labeled, it’s time to further customize your college application tracking spreadsheet.
You likely won’t need to submit every material to every college. Also, different colleges have different requirements for things like recommendation letters and test scores. For colleges where you don’t need to submit a particular material, put “N/A”. For materials like recommendation letters, for which criteria vary, add more details on what the college wants.
Once you have finished preparing a material, highlight the box in green. In addition, you can categorize remaining materials by priority level. Highlight boxes with materials you need to finish immediately in red. Then, highlight other boxes with materials that aren’t as urgent in yellow or another color of your choice.
Here’s a picture of what your spreadsheet should look like:

Lastly, I highly recommend organizing all college application-related materials in a central location. Whether you store files in your Google Drive or on your desktop, create folders labeled with the college name, and put all documents related to the college in the folder for easy access.
Step 4: Create an Essay Planner
Drafting multiple versions of your personal statement can create a headache. But what’s possibly even worse is the mountain of supplemental essays that can accumulate (depending on how many colleges you apply to).
Luckily, you can streamline your essay writing and organization process using… you guessed it, another sheet in your college application tracking spreadsheet.
Adding Prompts
First, copy all the prompts into the sheet, and organize them by college. Each row should contain a different prompt. Also, you should put the name of the college next to each prompt.
Another quick tip: I highly recommend adding another column for putting a target deadline. Otherwise, it’s easy to procrastinate prompts you don’t want to write and end up pulling a stressful all-nighter trying to tap into your introspective inner monk. Also, you definitely don’t want to delay writing “Why us” essays that require careful research.
Lastly, add another column with a toggle selection to indicate whether the essay is “not started,” “in progress,” or “complete”.
Color-Coding Prompts
Some supplemental prompts from different colleges may be similar to one another. If you feel like you can respond to certain prompts with similar responses, I recommend highlighting those prompts with the same color.
Here’s how your essay organization sheet should look:

Why Using Excel or Google Sheets Can Be Clunky
I mentioned at the beginning that both Excel and Google Spreadsheets have various disadvantages, which include:
Messy Spreadsheets
As you add more and more to your spreadsheets, they can quickly get messy and overwhelming.
No Centralized View
There’s no central location to view all your upcoming deadlines and application materials. You need to constantly switch between different tabs.
Can’t Add Attachments
If you’re using Google Drive, you can link documents. However, this can quickly get messy and confusing if you have multiple drafts for each essay. Also, you can’t attach files like supplemental materials (e.g., resumé drafts, portfolio videos).
No Reminders or Automation of Workflow
You have to manually check your college application tracking spreadsheet each time you want to know when to complete a certain material or when to submit an application.
With Excel or Google Sheets, you can’t set up automatic notifications for tasks or application deadlines.
Why I Prefer Notion
With Notion, you can avoid all of the problems mentioned above. Here are some key features of Notion that will streamline your planning and workflow:
Visual Appeal and Organization
Notion provides a visually appealing interface with various formatting options, including colors, icons, and different view styles. You can create visually pleasing boards, tables, or Kanban-style views to organize your college applications.
Having an aesthetically pleasing setup can enhance your productivity by making the planning and tracking process more enjoyable.
I find the Kanban-style board particularly useful because you can set up each column to represent a stage in the application process (e.g., research, application submission, acceptance/rejection). Then, simply drag and drop application cards between columns to visually track their progress!

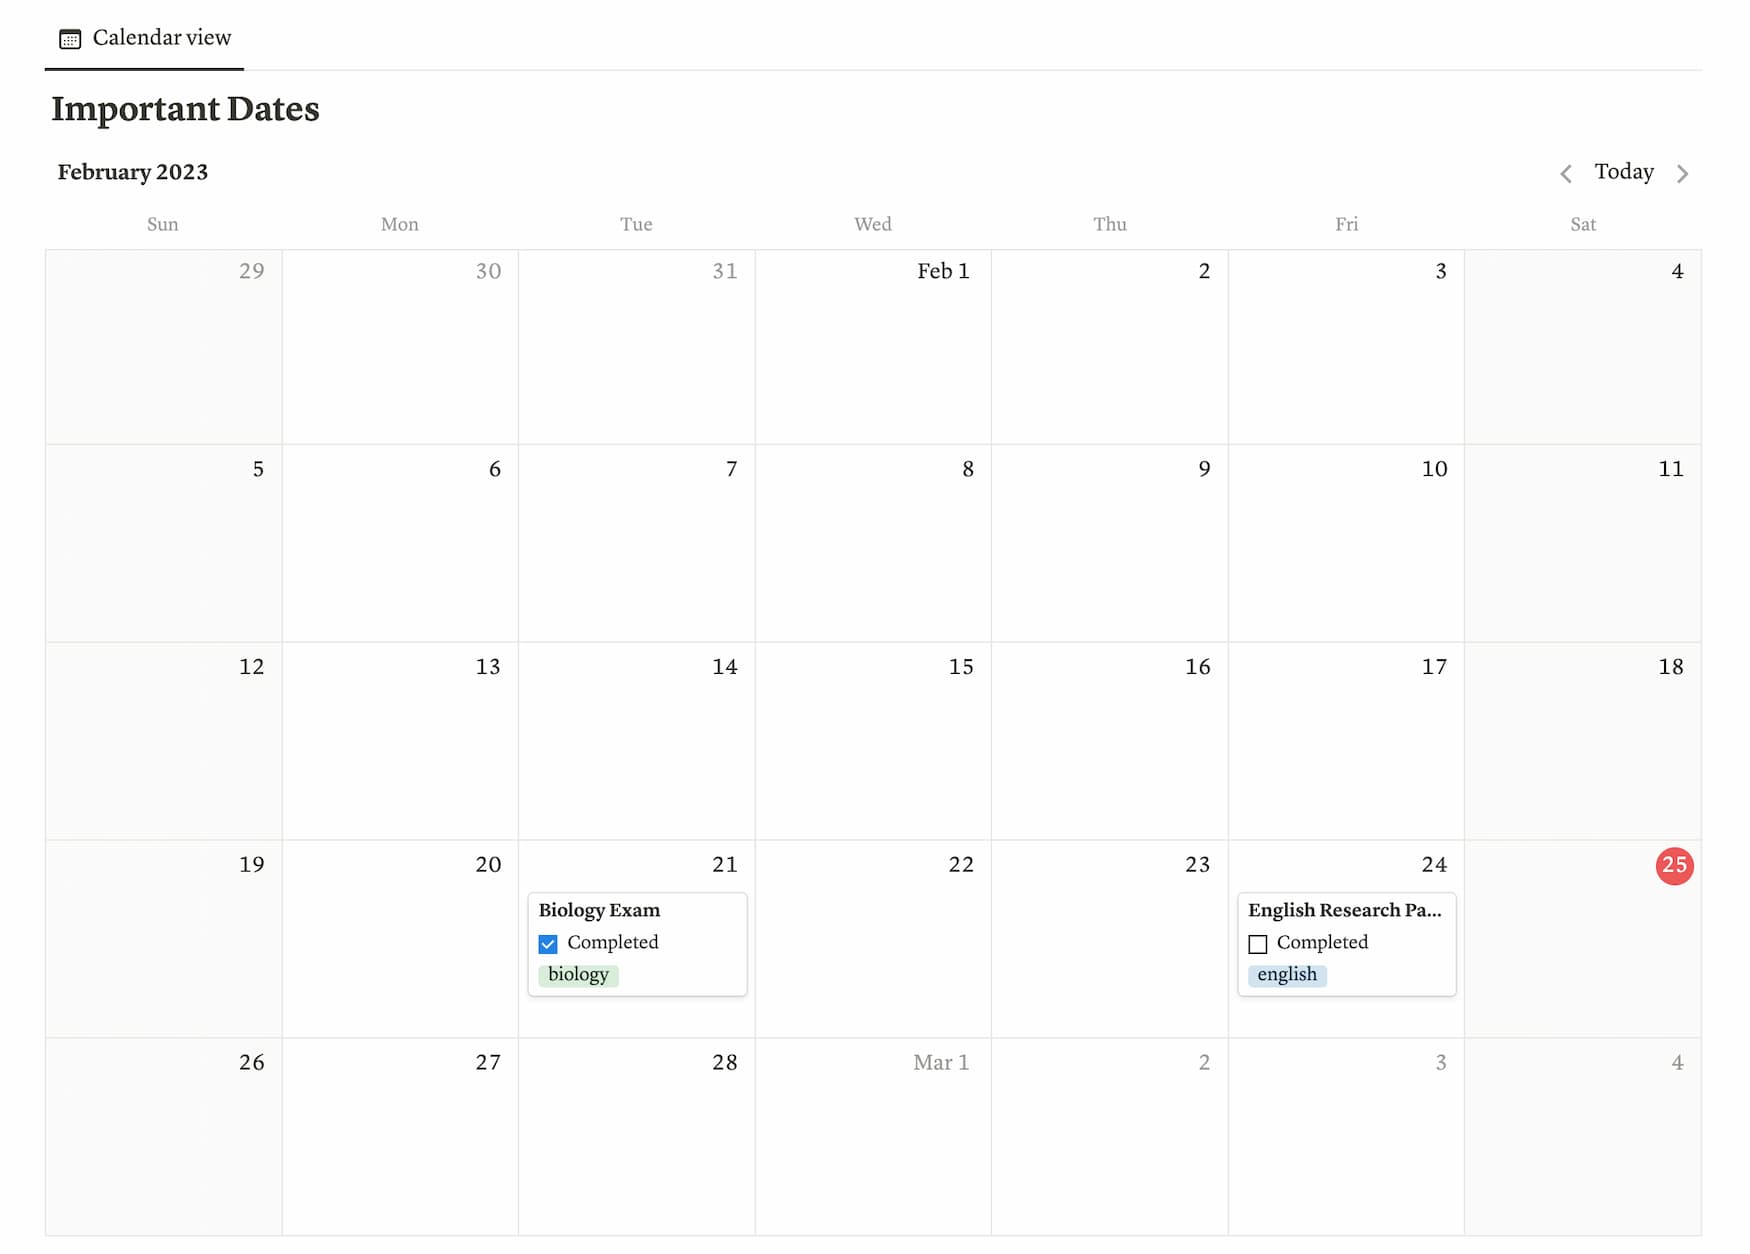
Calendar Integration
Notion provides a calendar view of upcoming deadlines, which means you can add application deadlines to your tracker and view them in a calendar format. This is super helpful in visualizing important dates and making sure you stay on top of submission deadlines.
Attachments and Notes
Notion makes it possible to attach and embed a variety of file types, including Google Drive documents, PDF files, videos, images, and more!
That way, you can organize all your materials, such as recommendation letters, essays, or transcripts, in one place. You won’t need to struggle with switching between different file management systems.
Mobile App Accessibility
Notion has a mobile app available for both iOS and Android devices. This means you can access and update your college application tracker on your smartphone or tablet, making it convenient to input information or check your progress on the go.
For instance, if you’re suddenly struck with an essay idea at the grocery store but fear that the idea will get lost in your Notes app, using Notion for essay organization (and organization of other application materials) will ensure that your idea won’t get lost.
Task Management and Reminders
Notion allows you to create task lists within your application tracker. You can set reminders for important tasks, such as submitting applications or requesting recommendation letters. Then, you’ll receive notifications to ensure you don’t miss any crucial deadlines!
Plus, you can create a central dashboard where all your upcoming deadlines are located and automatically updated to display deadlines for the coming week (or month, or whatever other time interval you set it to). This makes planning much more flexible and convenient.
Cross-Referencing with College Profiles
In Notion, you can store information in databases (which are basically tables with rows and columns for organizing information, but way more flexible and dynamic). Perhaps one of the most powerful features of Notion is the ability to relate databases to one another.
For instance, suppose you create one database to track your progress on different college applications. Each entry in the database is a different college application, and each column is a property (such as the progress status of the application, the deadline, the portal link, etc.).
Let’s say you create another database to store all your essay prompts. You can set up a relational property between the two databases—the one for college applications and the other one for essays—and link your essays directly to the corresponding application.
These are just two ways to use database relations to track your college applications. If you get creative with it, you can even use relational properties to do things like automatically calculate your progress on specific applications as you check things off your to-do list!
Sounds Confusing? Here’s a Quick Way to Get Started!
If this all sounds overwhelming, don’t worry. As a beginner, Notion templates can be a game-changer.
If you don’t want to start from scratch, all you have to do is duplicate a suitable template from a wide range of pre-designed templates created by the community. You can find templates specifically tailored for college application tracking.
This will save you lots of time—you can have a streamlined Notion college application tracker with a few simple clicks and no experience with using Notion.
To get started, just head to notion.so and sign up for a free account. You can browse the Notion template gallery for suitable templates. Or, if you want, you can grab my free Notion college search template to get started:
Overview of Creating a College Application Tracking Spreadsheet
If you don’t want to be scrambling to prepare materials last minute (or possibly forget to submit something), using an organized college application tracking tool is essential. Here’s a quick recap of how to set up an effective tracker:
- Choose a platform: You can easily create a college application tracking spreadsheet with Excel or Google Spreadsheets. However, as I discussed extensively in this article, I much prefer the flexibility and versatility offered by Notion.
- Create a college research list: There are lots of tools online to help you get started. You should make a list of key features to look into for each college.
- Create an application checklist: Once you’ve decided which colleges you’re going to apply to, you need to keep track of all the required materials and your progress on each of them.
- Create an essay planner: Having a centralized view of all your essays, your progress on each of them, and upcoming deadlines will save you from the chaos of having scattered documents and forgetting what you’ve already written and when essays are due.
Although Excel and Google Spreadsheets provide the necessary tools to do these things, I truly believe Notion helps take your organization to the next level by offering features like:
- Visual appeal and organization
- Calendar integration
- The ability to upload/embed attachments
- Mobile app accessibility
- Streamlined task management and automatic reminders
- Cross-referencing between databases
- A comprehensive template gallery with pre-designed setups
You can get started by checking out my free Notion template below:

For more articles on organization and college applications, check out:
- College Application Timeline for Seniors: Must-Do Tasks!
- Best All-in-One Aesthetic Planner App for Students
- Why Junior Year is Not Too Late to Start Extracurriculars
- Failproof Strategies to Answer College Interview Questions
- How to Stop Comparing Yourself to Others Academically
- How to Create an Aesthetic Notion Setup With Zero Experience
I hope this article helped you understand exactly how to manage your college applications without the usual stress and chaos! What is one tip you have for organizing college applications? Feel free to share in the comments below!
Want a head start? The All-in-One College Application Organizer in my shop was made for exactly this — it’ll save you a ton of time.