How to Set Up Notion for Students (+FREE Aesthetic Template)
If you’re reading this post, you’ve probably heard about Notion, the all-in-one workspace that’s been very popular in the study community.
However, if you’re not familiar with it, no worries!
In short, Notion is a planning app that is structured like a personal website. You can customize it any way you like to organize all aspects of your life.
Since using Notion, I’ve been able to start many productive habits, manage my student blog and other projects, self-study classes, coordinate my schedule, and organize my notes without feeling overwhelmed.
As someone who was always a pen-and-paper planner before, Notion provides such flexibility and ease of use that I haven’t looked back.
For more on what Notion is and how you can use it as a student, check out this post.
However, if you’ve already decided to start using Notion, keep reading. In this post, I’ll be providing a complete guide on how to set up Notion for students. It’ll contain the following sections:
- Steps to get started with Notion (even if you have no experience)
- All the pages you need to organize your entire student life and how to set them up
- A free Notion student template, which you can duplicate, customize, and start using right now
Let’s get right into it!
How to Get Started With Notion
Step #1: Sign Up
First, head over to notion.so and click the signup button to create an account.
The free plan is sufficient for personal use. It contains unlimited blocks, so your Notion setup will be completely scalable as you expand it.
Step #2: Download the Notion App
The Notion app is available for desktop, tablet, and mobile devices. I currently have the app installed on all of my devices for easy access.
To download the app, simply click on the “Download” dropdown in the top bar, then select the corresponding option.
Step #3: Set Up Columns
To create a column, hover over the left-hand side of a line. Click on the six dots, and drag the line over to where you want to set up the column.
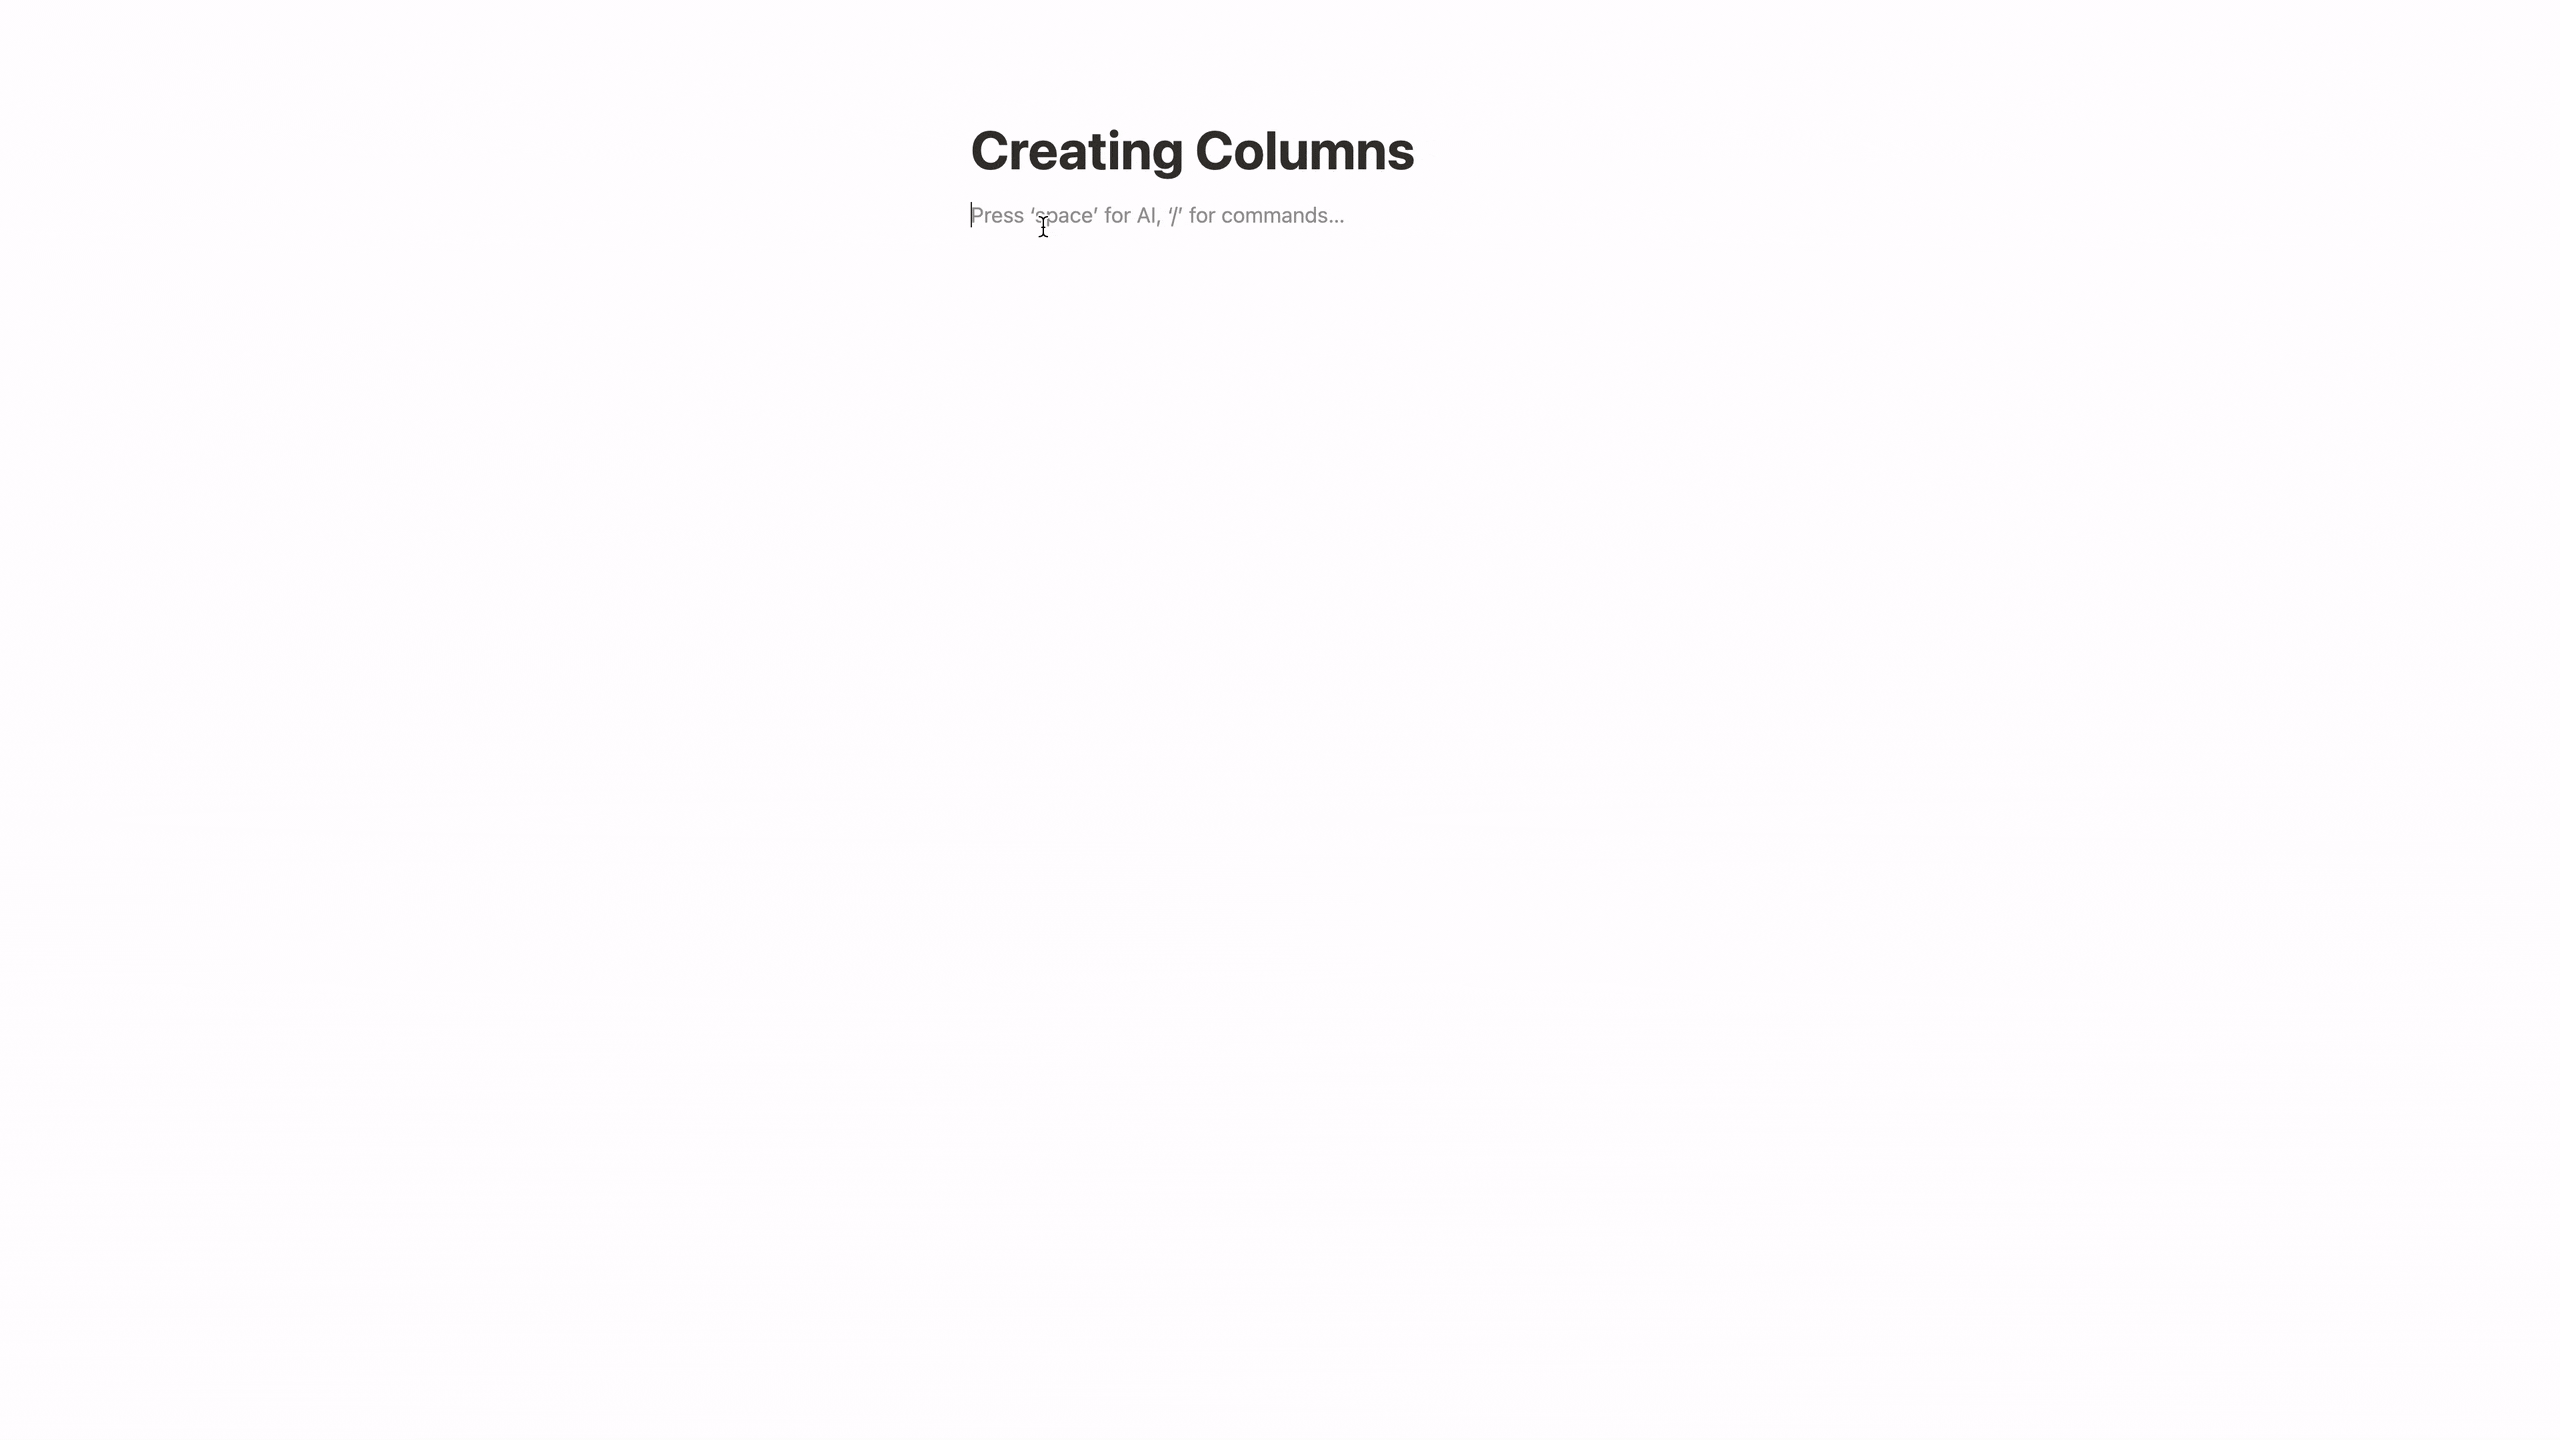
Since Notion columns are “invisible” unless you hover over them, I recommend adding a number to indicate the column’s presence. You can delete this once you add content to the column.
You can add as many columns as you want (just keep dragging and dropping). Also, you can adjust the width of each column by dragging its border.
Step #4: Get Familiar With the Basic Features
Notion can seem a bit overwhelming when you first open it. However, if you spend some time playing around with the features, you’ll find that it’s very intuitive and easy to use.
Here’s how you can get started:
Delete the Existing Pages
When you first create a Notion account, you’ll see several existing pages. They’re meant to help you get started, but to be honest, I found them very overwhelming when I first started.
I recommend deleting them all, so you can start with a clean slate.
Customize the Page Settings
In the top right-hand corner, you should find three dots. Once you click on them, a dropdown will open up.
You can change the font on the page (there are currently three options). You can also set the page to full width, which is my preference. You can also toggle to small text, but I personally prefer the default font size.
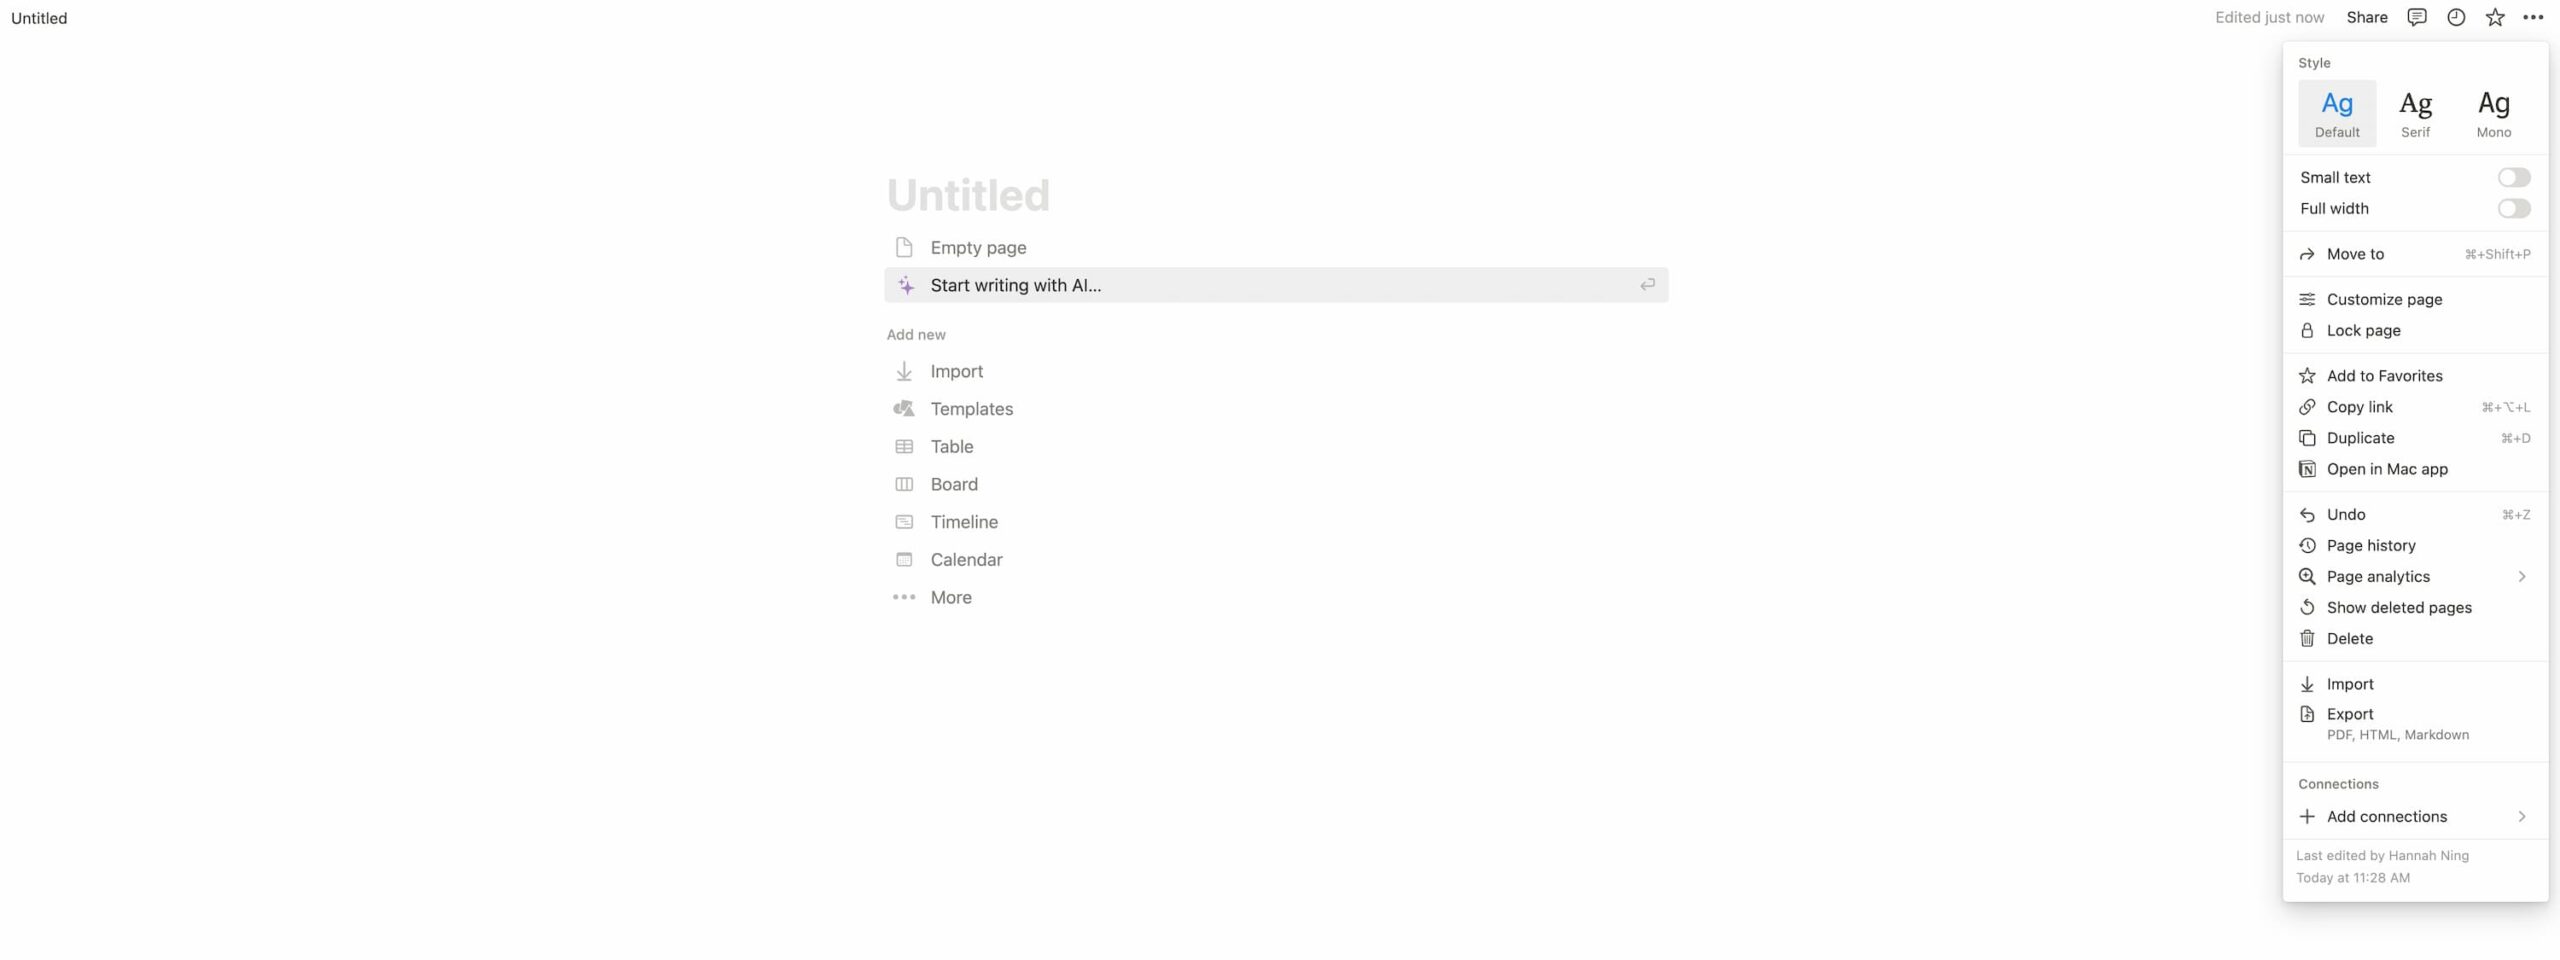
Customize the Page Header
Hover over the page title. You’ll see options for changing the icon and the cover image. You can choose from the existing icons and images, or you can upload your own.
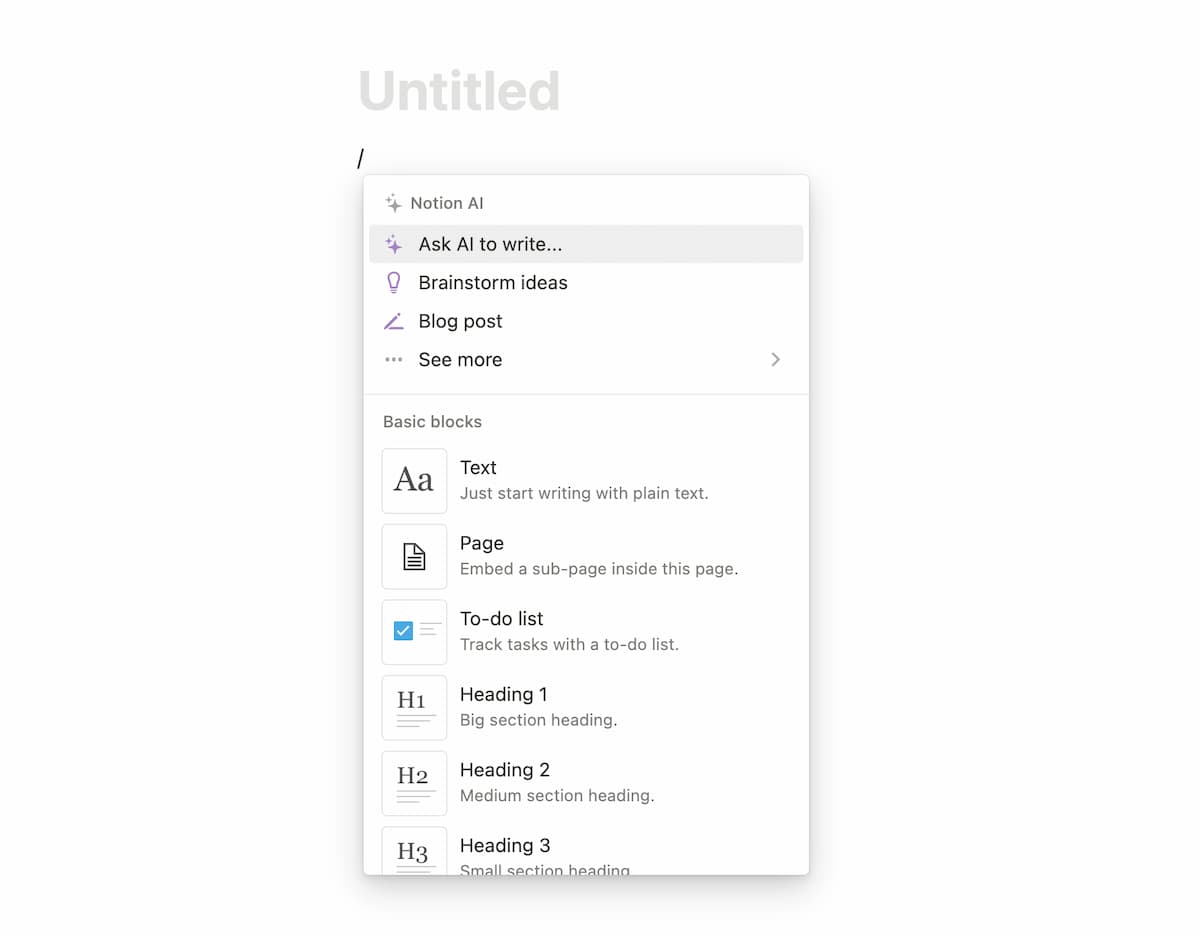
Add Different Blocks
Click anywhere on the page and hit backslash (/) to open up a list of block options. You can play around with these to see what they do.
Here are the ones I use most frequently:
- To-do list: This creates a checklist where you can write down your tasks.
- H1, H2, and H3 headers: Use headers to organize text into sections.
- Toggle: To prevent text from getting cluttered, you can store certain sections in dropdowns. I use toggles in my daily to-do lists to organize my tasks into categories and to prevent my agenda from getting cluttered.
- Image: You can embed images from your device or from the Internet.
- Web bookmark: If there’s a webpage you want to remember, you can create a bookmark block for it.
- Callout: I like using this to make quotes or notes stand out.
Learn About Databases
When you hit backslash, you’ll see several options involving databases. This can feel overwhelming at first, but fortunately, databases are easy and powerful tools to use once you become familiar with them.
If you’ve ever used Microsoft Excel or Google Spreadsheets, Notion databases are similar. They allow you to store, organize, and apply functions to data. I watched this video to learn about databases. It’s a bit lengthy but totally worth the time and easy to follow.
Setting up databases can help you streamline and automate so much planning and organization.
These are the database views you can set in Notion:
Table View:
To organize your data in rows and columns.
Board View:
To organize your data based on a property you’ve assigned to it. In the Table view, each column is a property.
For example, say you set a property to “Status” to track your progress on tasks. If you were to create a Board view for that data and organize it by the “Status” property, you would have a clear view of your progress on each task.
Gallery View:
To organize each database entry as a block. If each entry contains an image, this is a great way to view each entry.
You can also select which properties you want to be displayed in the view.
List View:
To organize all your database entries into a minimalist list. Again, you can select which properties you want to be displayed.

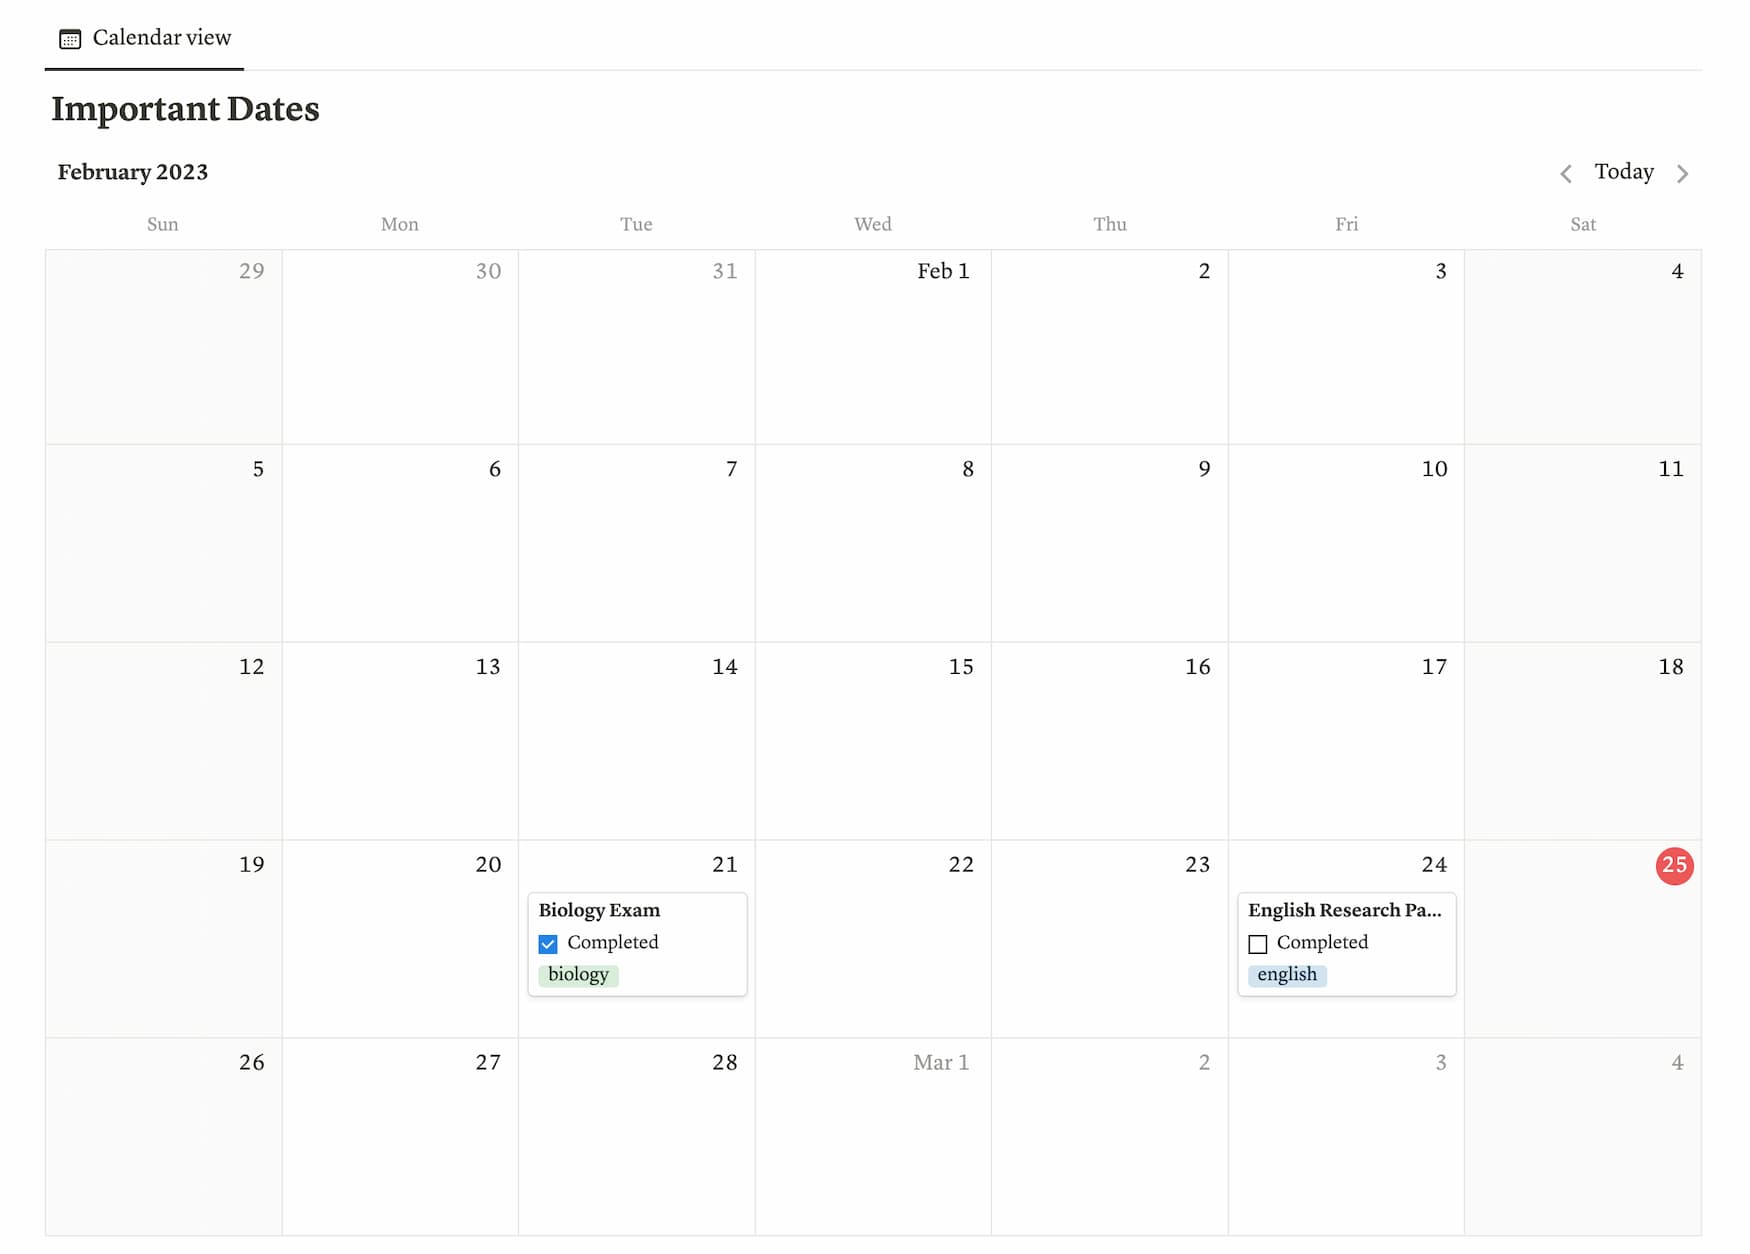
Calendar View:
To organize database entries in a calendar. If you have “Date” set as a property, this is a helpful way to visualize your entries.
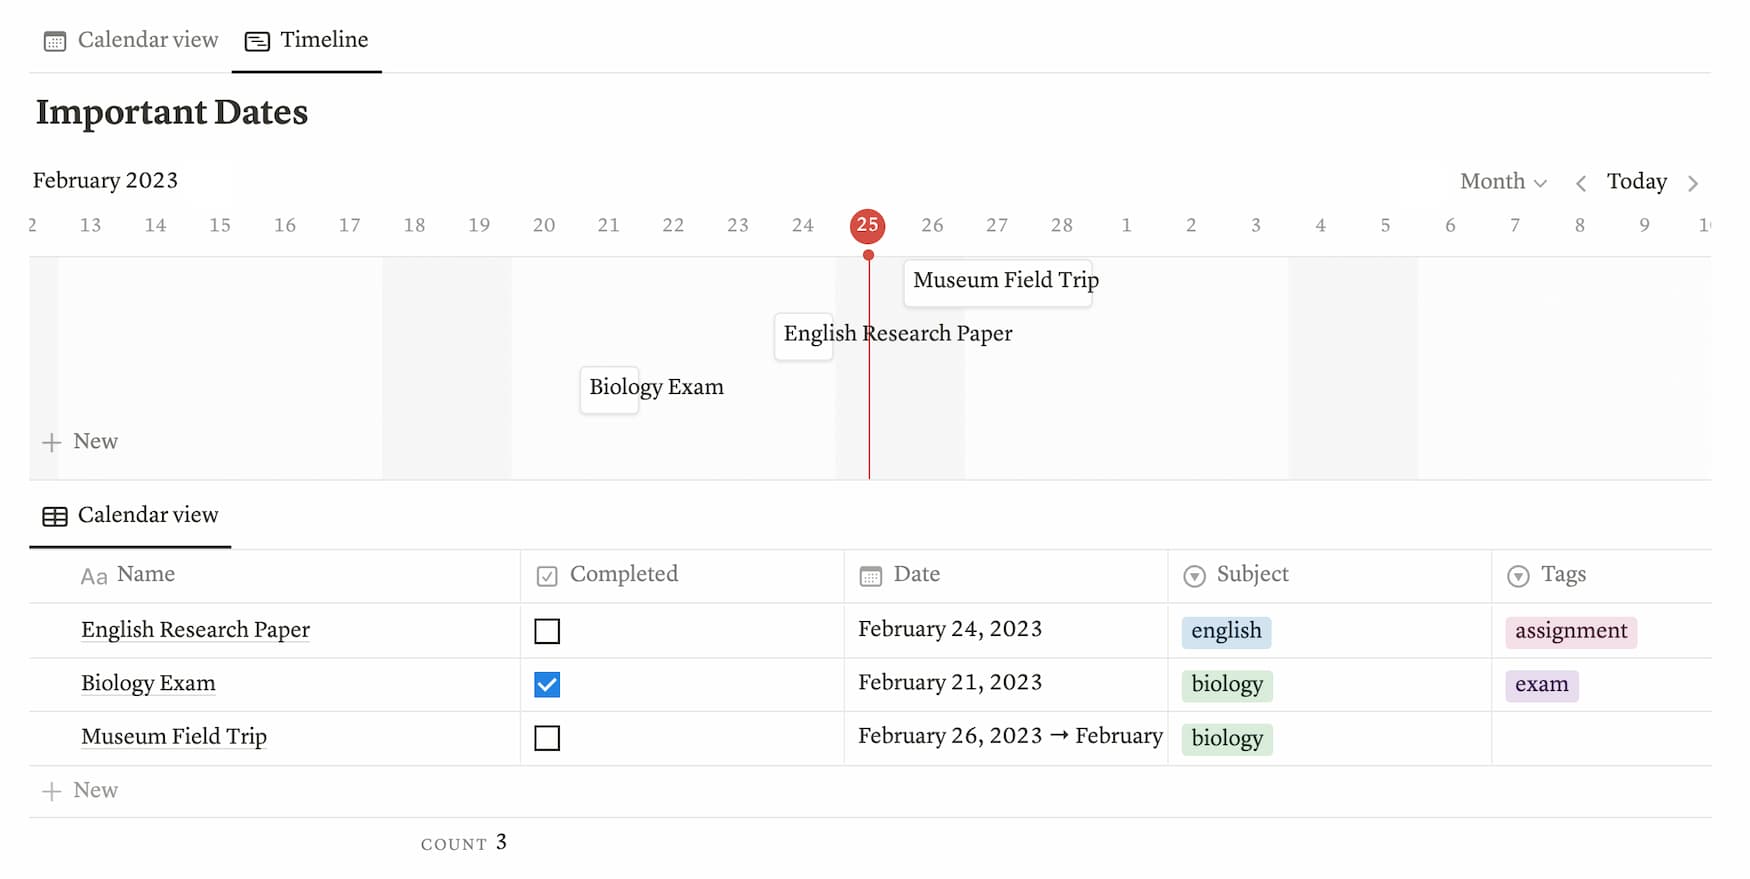
Calendar View:
To organize database entries into visual time segments. If you have “Date” set as a property and you’re storing data ranges, then this is a helpful way to visualize your entries.
Notion Databases are Powerful Because:
You can create multiple views for each database.
For example, if you want to create a Table and Board view for a given database, you can! You may have noticed in the images above that some databases had multiple tabs for different views.
You can also sort and filter database entries in each view. (For example, you could sort database entries by the “Date” property in ascending or descending order.)
You can add a view of a database on any page you want.
Say you have a database to store assignment deadlines and upcoming exams on your Course Hub page (more on this page later in the post).
You also want the database to appear on your Dashboard (more on this page later as well). Then, you can put the database in both pages!
You can relate databases to one another.
Arguably the most powerful feature of Notion databases, this allows you to relate entries from one database to entries in another database. The two ways you can relate databases are through the “Relation” and “Rollup” properties.
I recommend checking out this guide to Relations and Rollups from Notion. Or, you can watch this video I mentioned earlier, which covers pretty much everything you need to know about databases.
Final Notes on Getting Started With Notion
Remember, if this all seems a bit overwhelming right now, don’t worry. The best way to get started with Notion is to dive right in and start playing around with all the features.
Get familiar with customizing each page and learning about the different blocks. You don’t have to figure out what each block is for right now—just the ones that you’ll most frequently need. (I’ve been using Notion for a while now, and I still don’t know what every block is for.)
Now that we’ve covered Notion’s basic features, it’s time to learn how to set up Notion for student use. At the end of this post, you’ll find a free Notion template that contains all of the pages I’m about to cover!
How to Set Up Your Notion as a Student
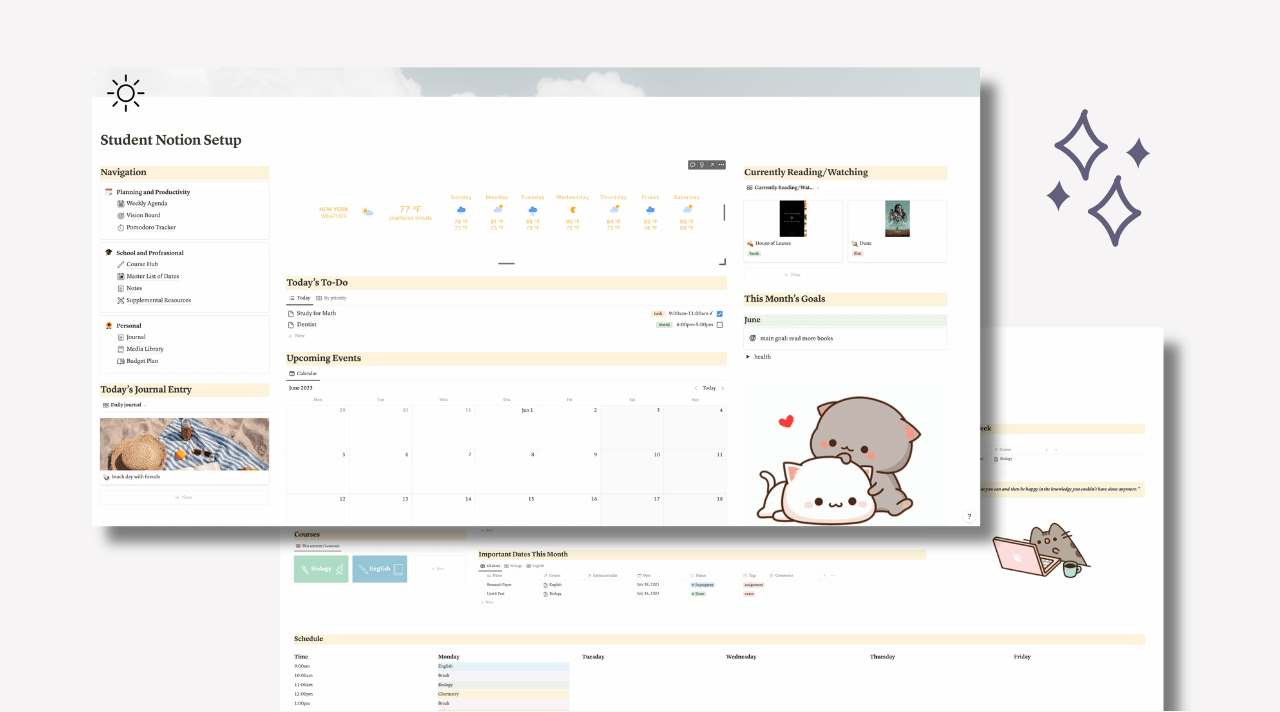
Dashboard
The dashboard is simply a homepage that links to all your main pages. Think of it as a central navigation.
To add a subpage, hit backslash and select the “Page” block.
In addition to your main pages, you can add different widgets and images to make your dashboard more aesthetically pleasing.
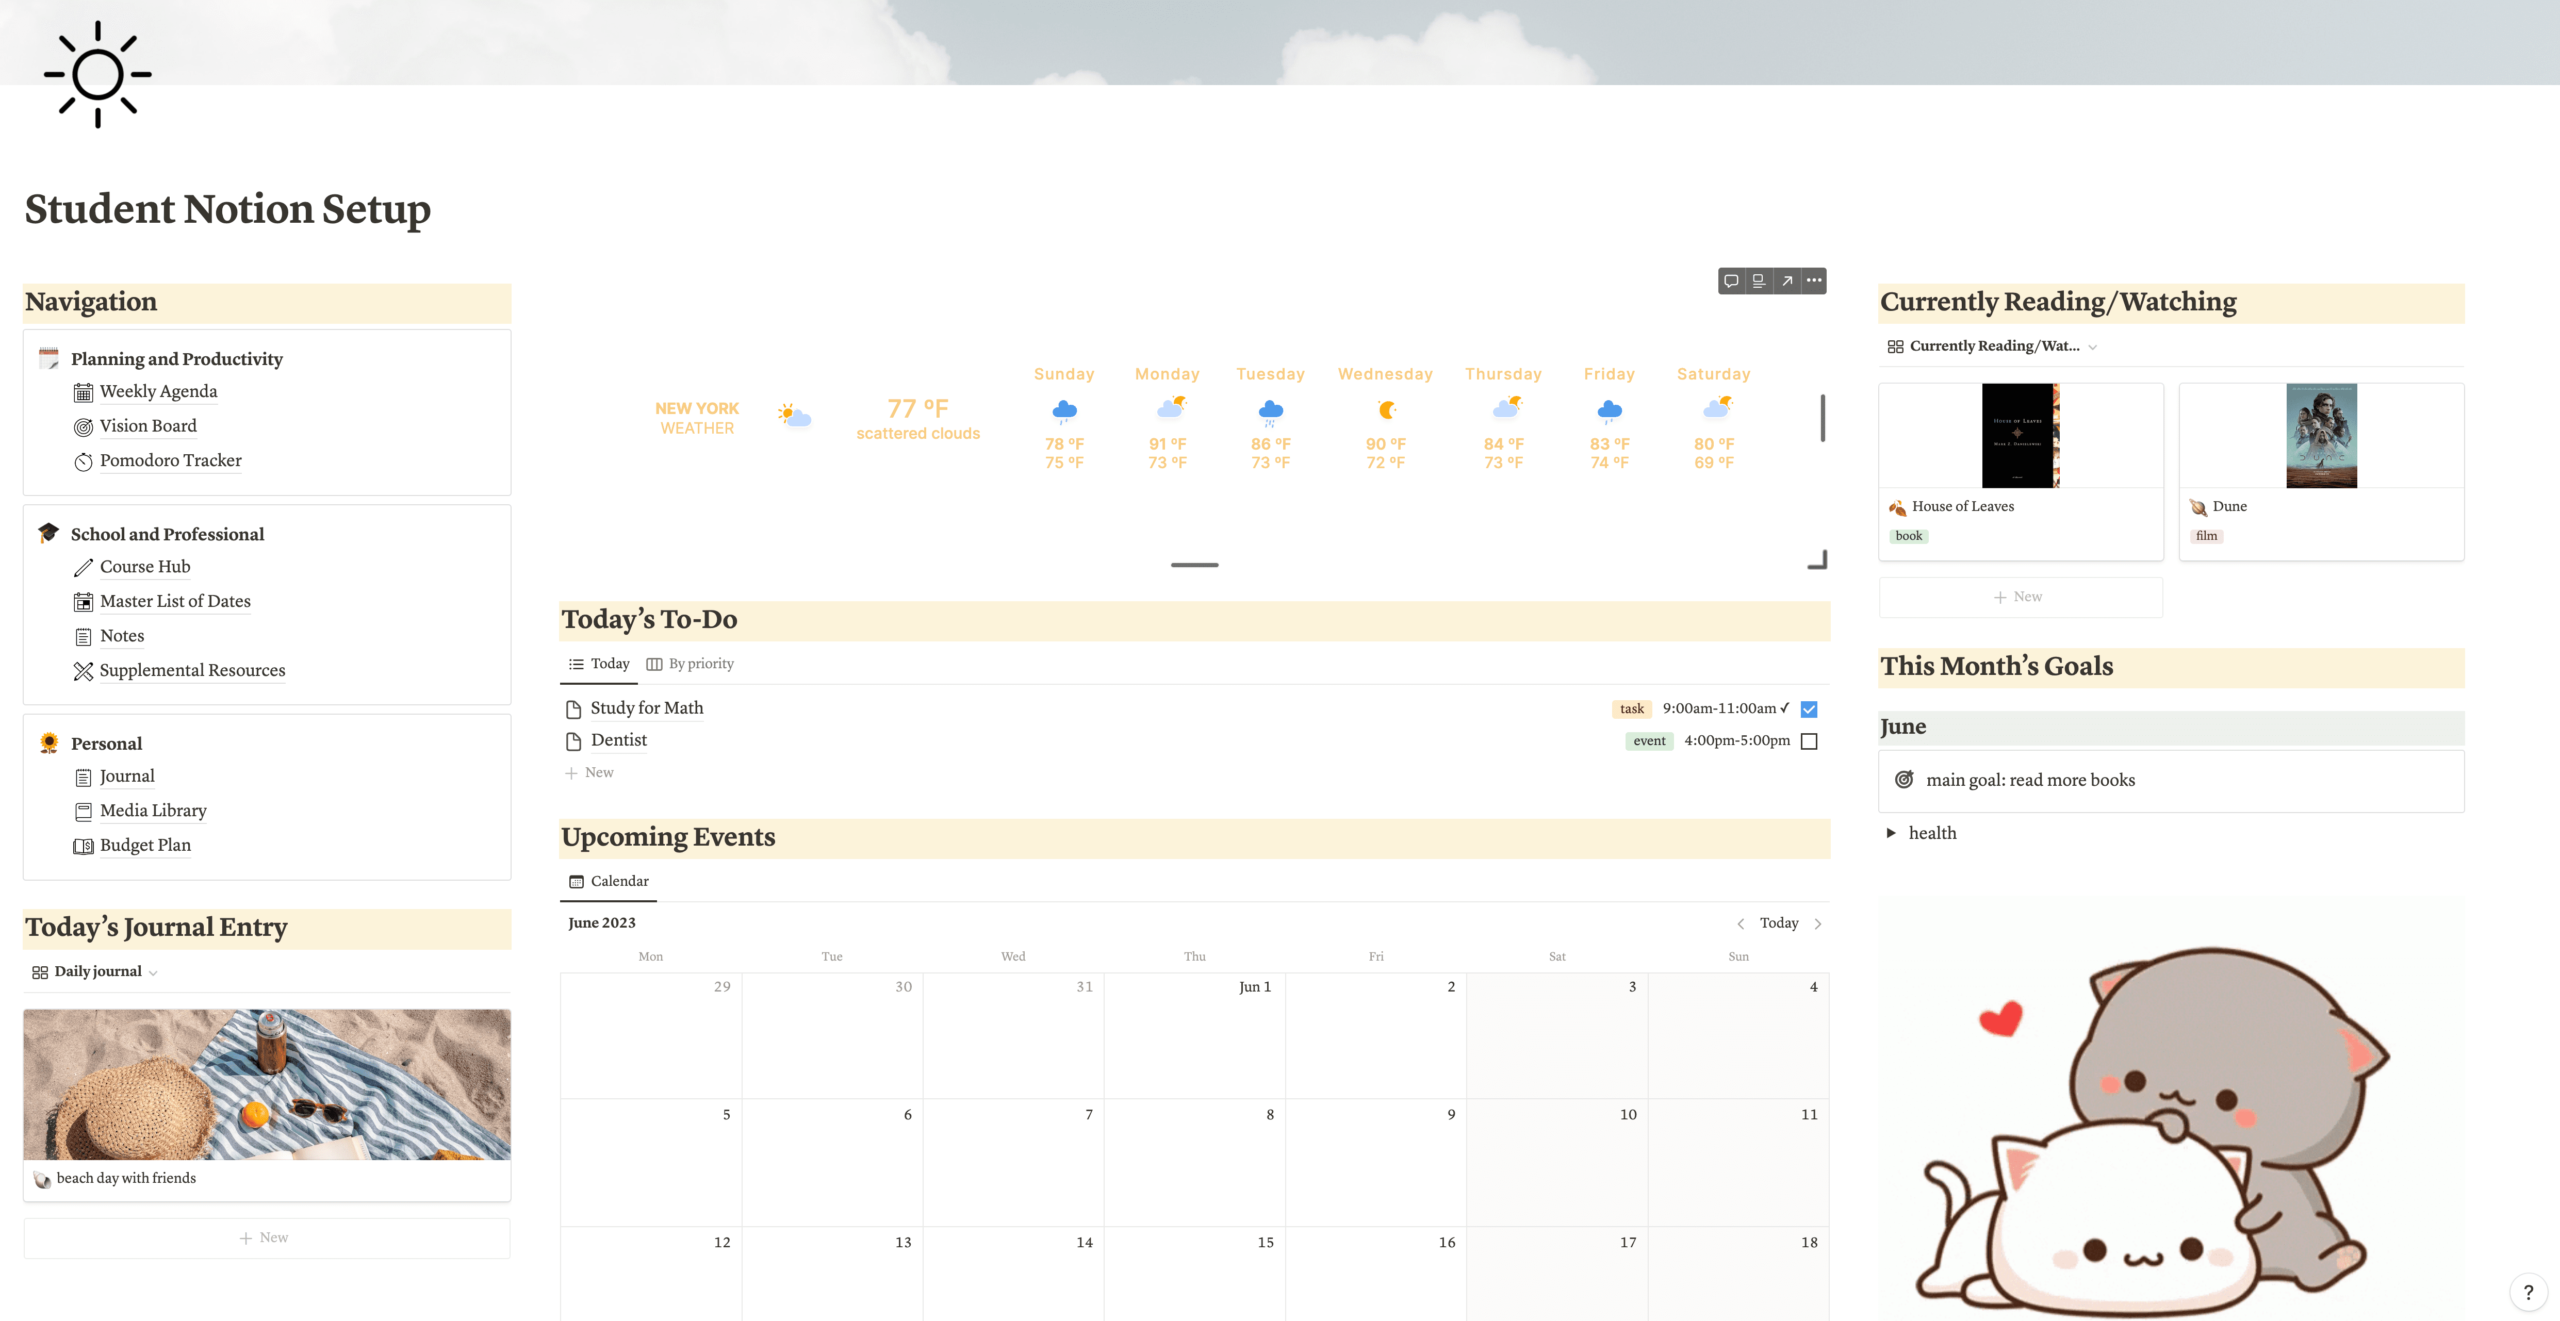
Weekly Agenda
Similar to a paper agenda, you’ll need a weekly setup to plan your daily tasks and events, as well as weekly goals.
To set up my weekly agenda page, I created a Calendar database that I’ve set to the Week view (so it only display tasks/events for the current week).
As you can see, I’ve also created a template button called “New Week” to generate a new weekly evaluation each week. To do so, hit backslash and select the “Button” option. Then, select “Insert blocks”.
For some reason, you can’t set up columns in Notion buttons directly. To create a setup with columns, you’ll need to create a subpage within the Template button configuration. (Hit backslash and select the “Page” option.)
Next, set up your columns in the new page. Remember to change the settings on the page (font, page width, etc.) to match the rest of your setup.
Once you’ve set up your weekly evaluation, head back to the button configuration. To edit the configuration, click the settings icon on the right-hand side.
When you open the configuration, you should see the subpage you just created. Click on the three buttons on the right hand side of the subpage, then select the “Text” option. This will turn the page into text.
Finally, change your button name to “New Week” and that’s it!
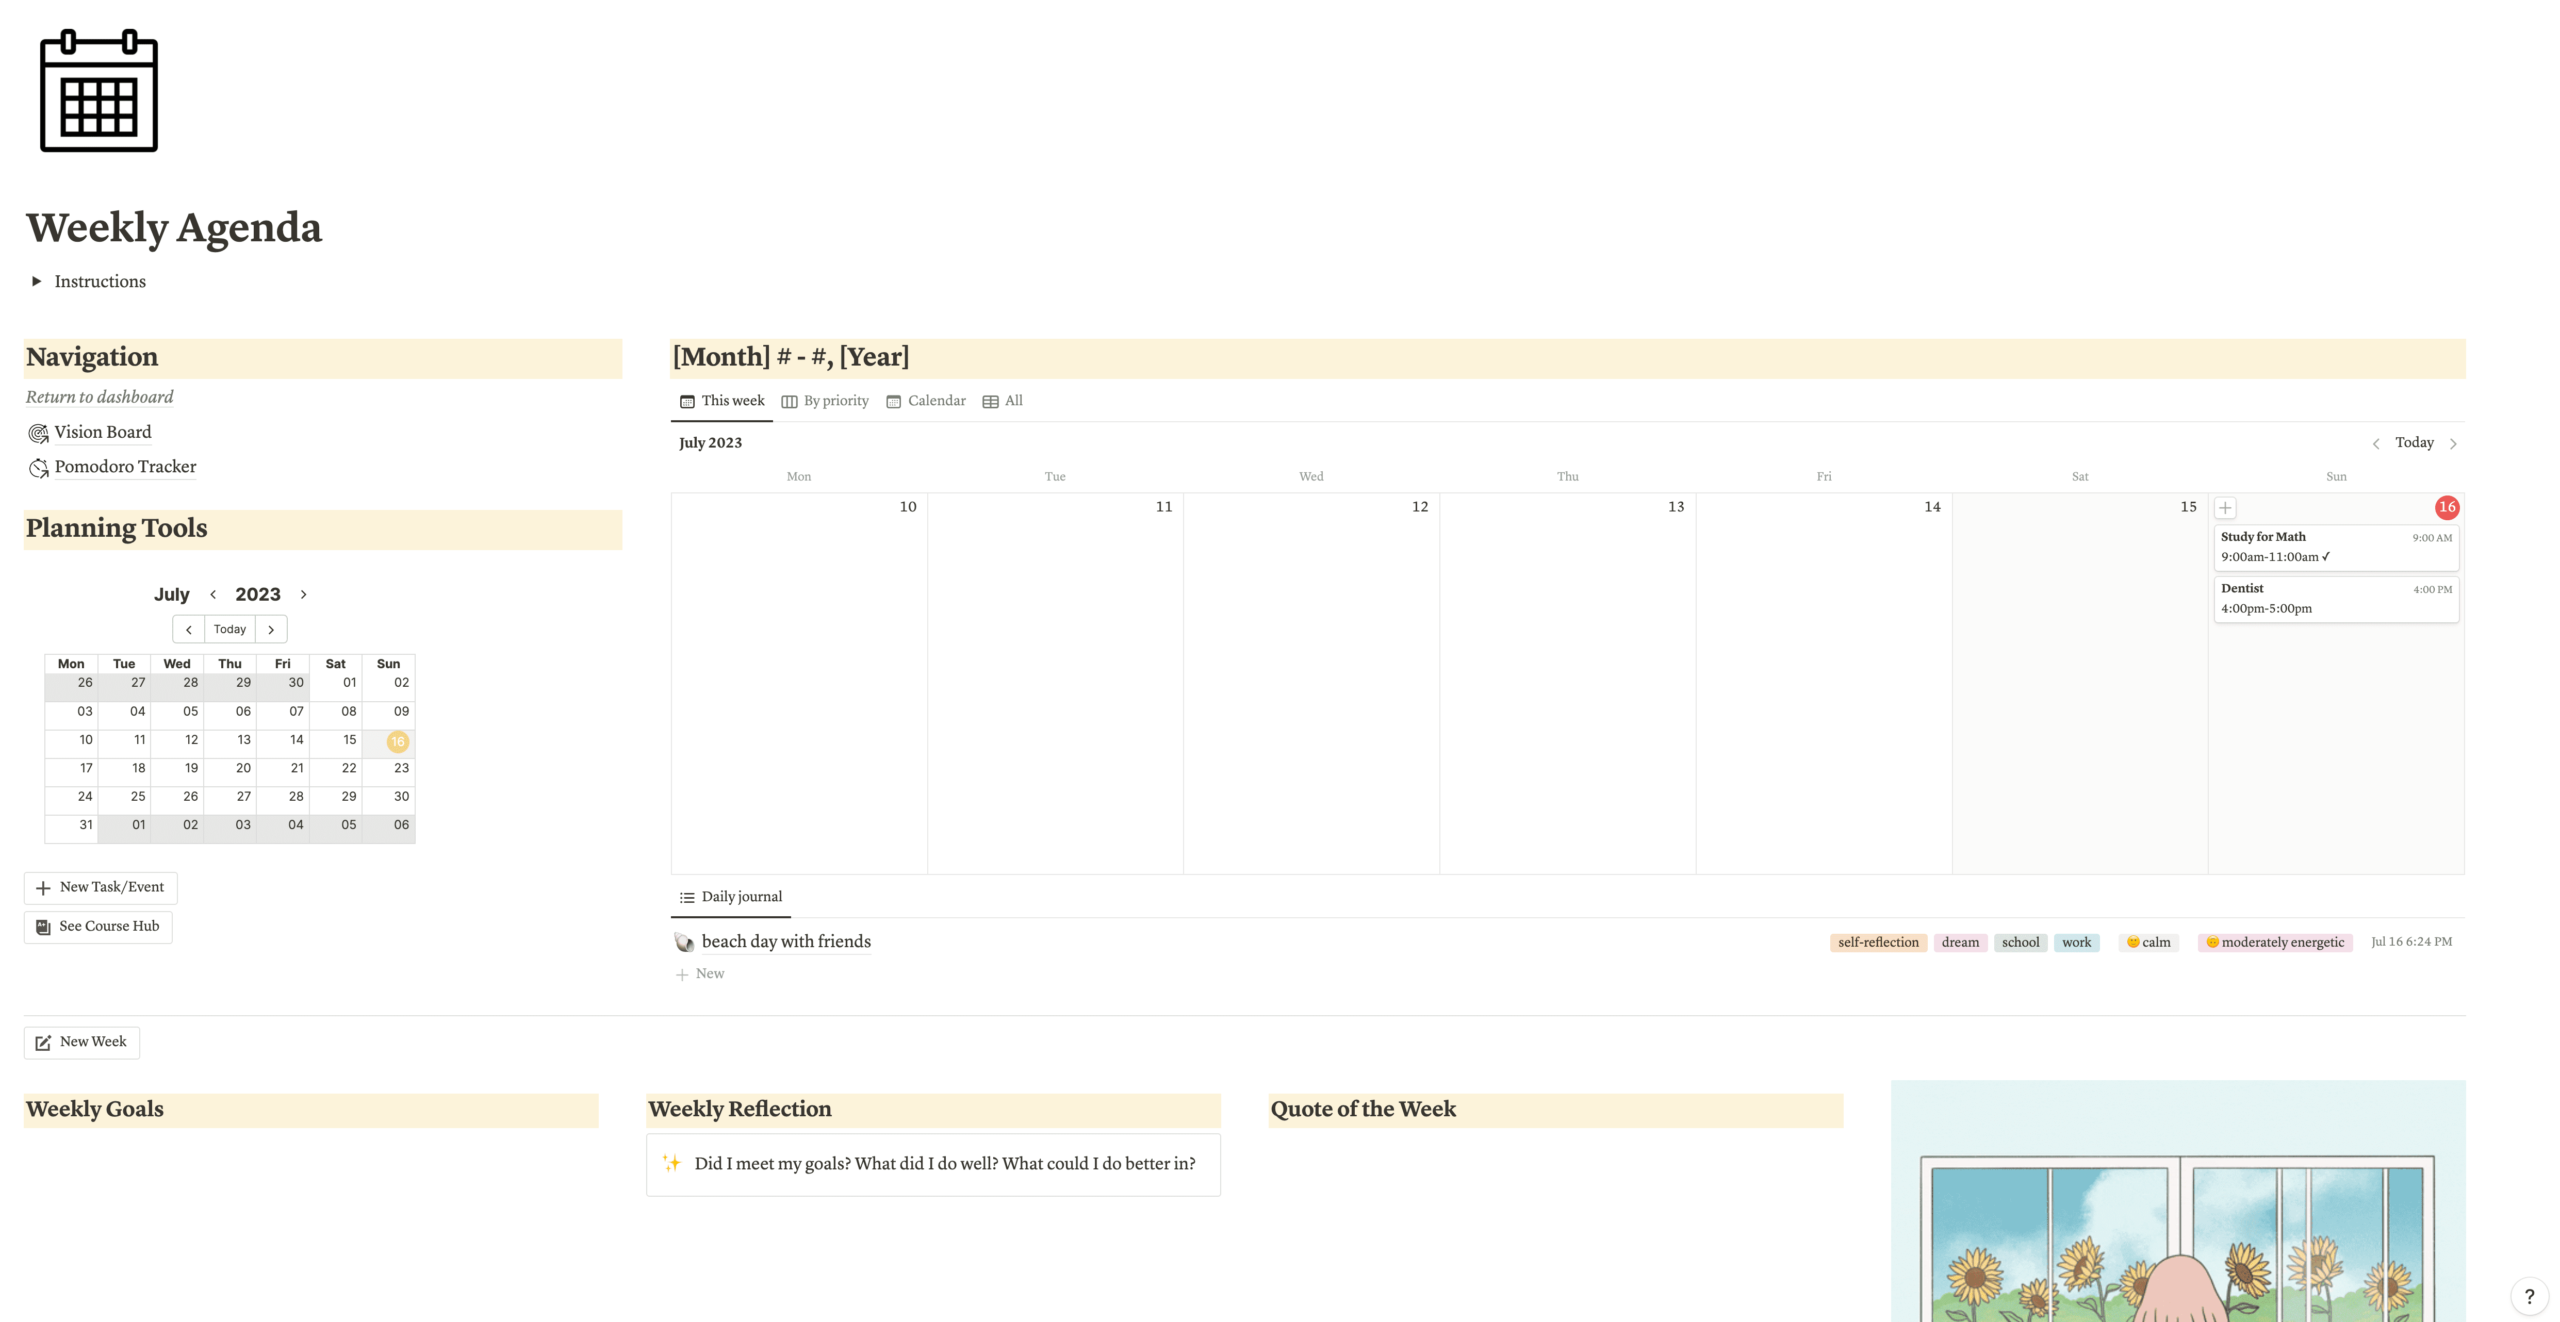
I like to store past weekly agendas in an Archive page at the bottom of the page. This is a subpage I created in my Weekly Agenda page, where I store past agendas under toggles.
When a new week starts, I drag and drop the contents of the past week into a toggle, then drop that toggle into the Archive page. (The Archive page isn’t pictured in the image above, but I keep it at the bottom of the page.)
Vision Board
You can create a vision board to store your long-term goals. To set up my vision board, I created a list of goals under each month.
I also set up columns at the top titled “Who I Want to Become”, “Things I Want to Learn About”, and “Positive Affirmations”.
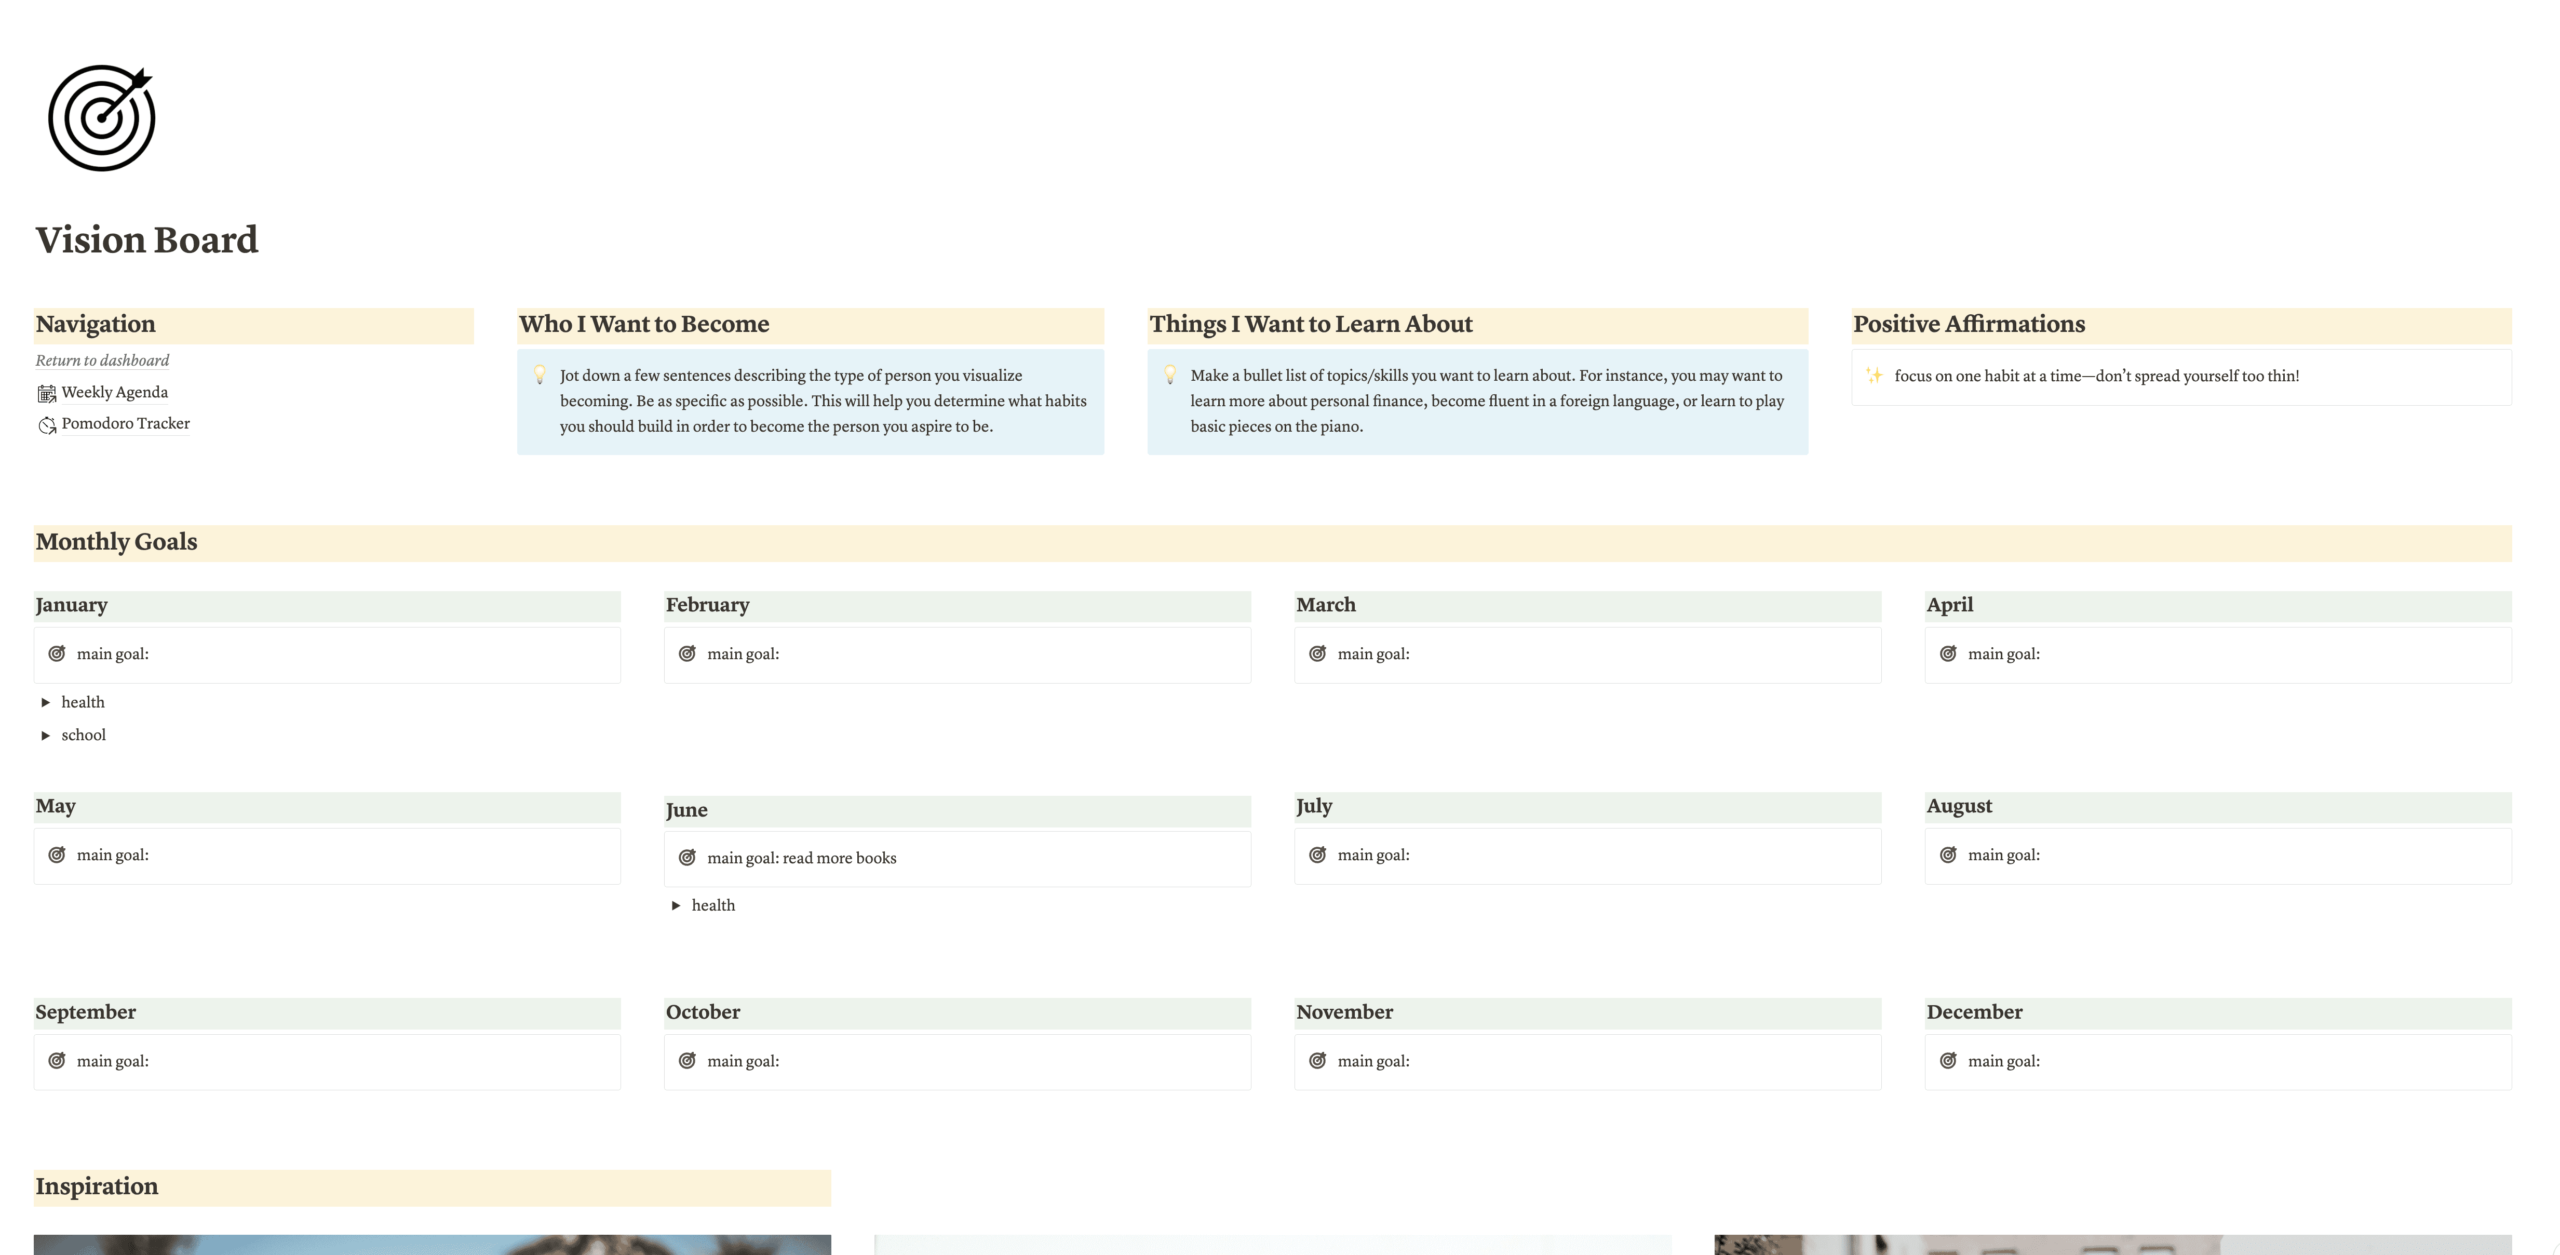
If you have a long-term project (or project) that you’re working on, this is a great place to plan out what you want to accomplish each month.
Alternatives to a vision board include a bucket list, which you can organize by category (e.g. health, academics, travel). Or, you can create an inspiration board by embedding pictures in a collage style.
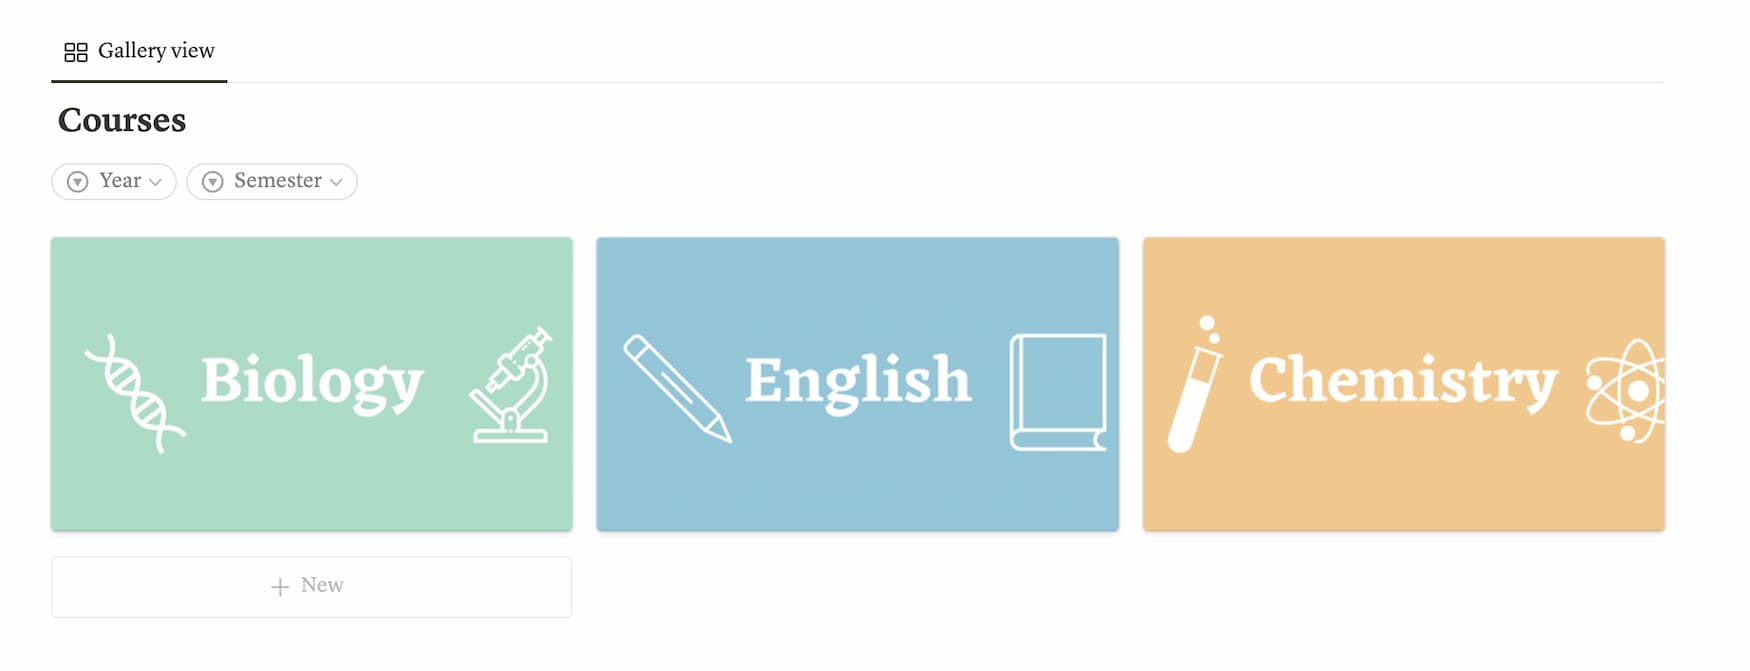
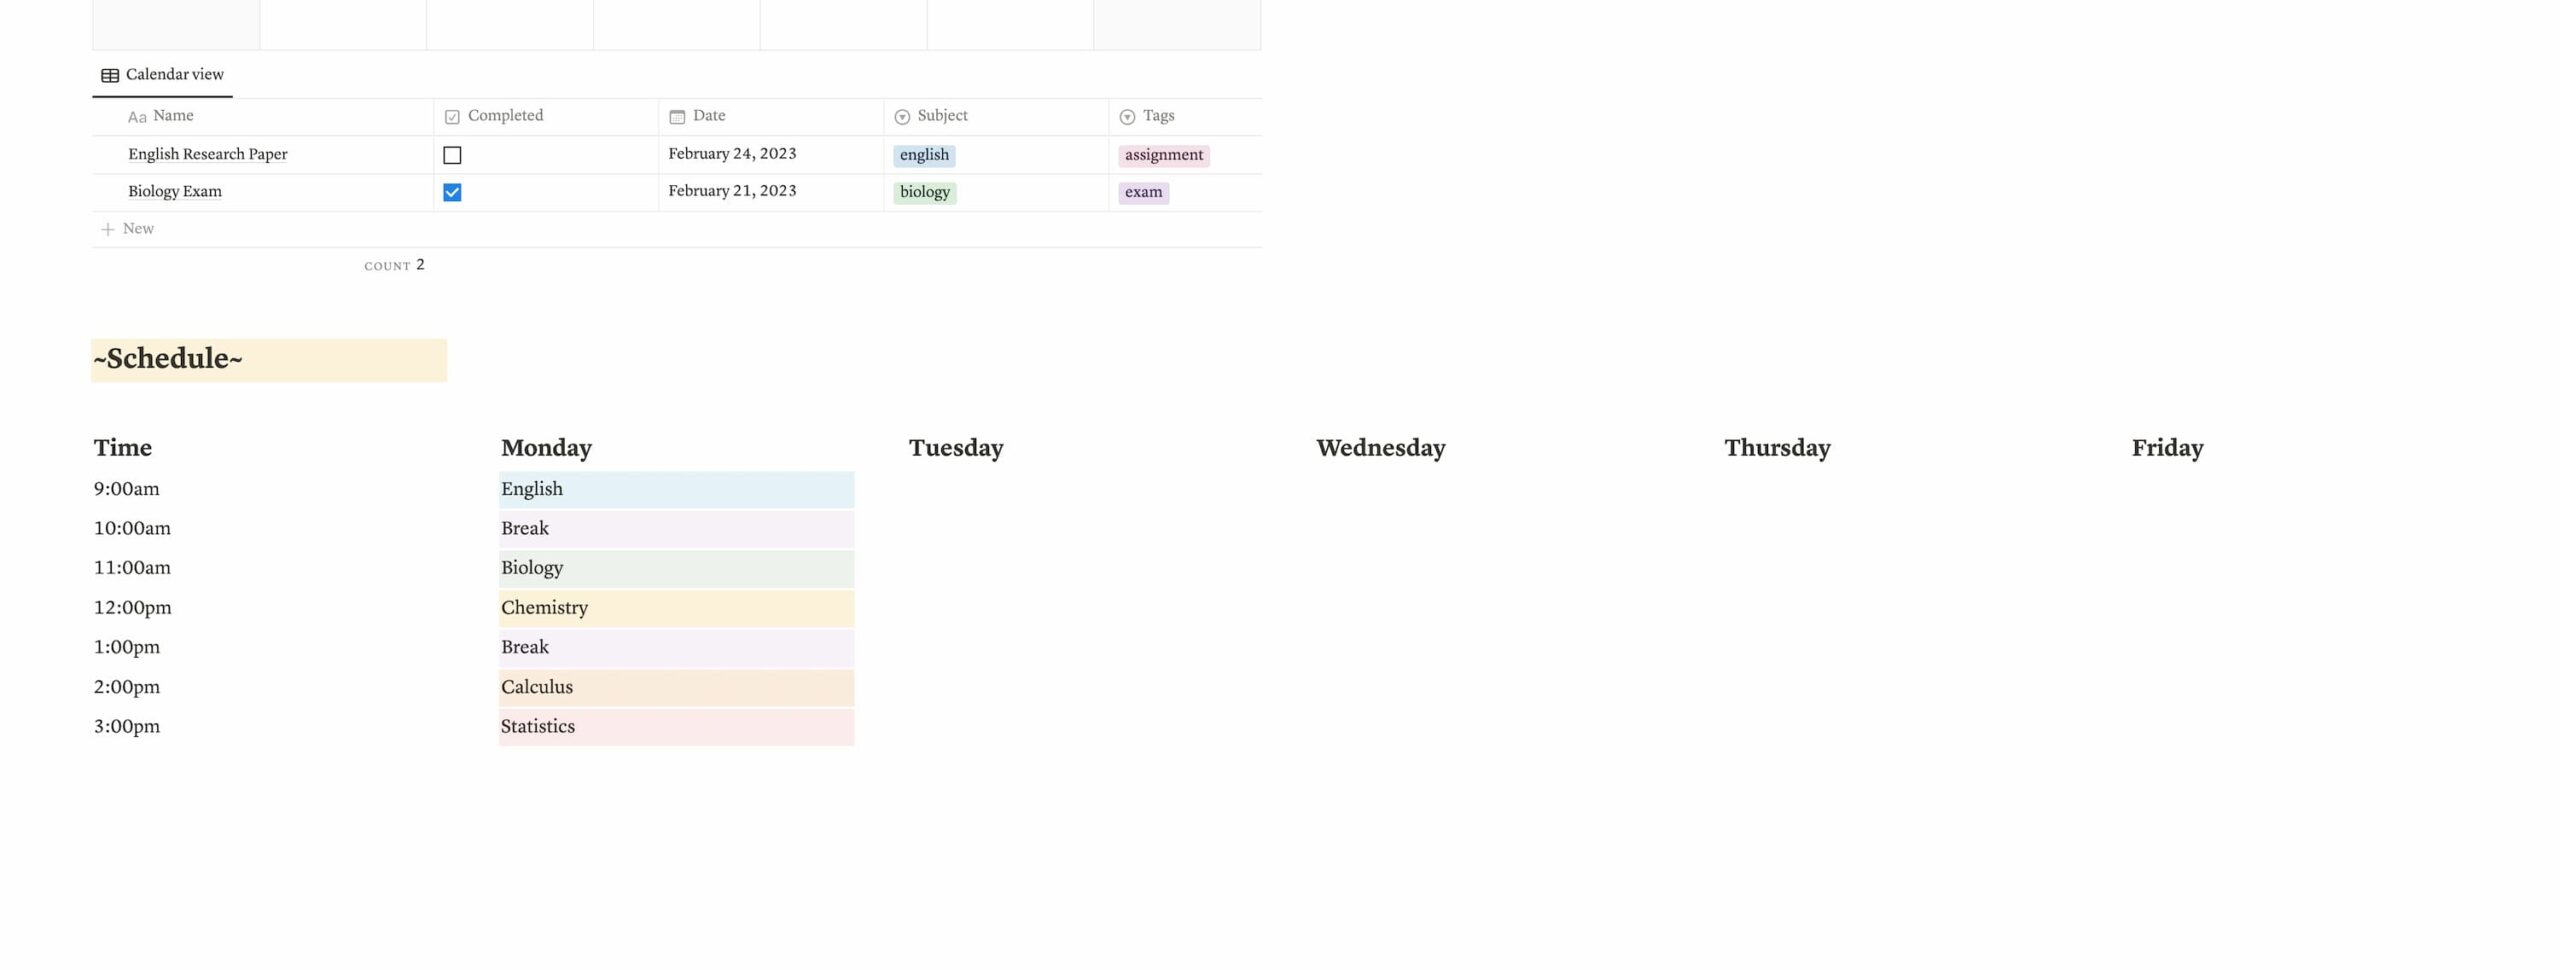
Course Hub
The Course Hub is a place to organize everything school-related. In my Course Hub, I have a database for storing important dates (e.g. assignment deadlines, exam and lab days) called “Important Dates”. I currently have this database set to the Table view.
(Quick Note: The database under Important Dates This Week and the database under Important Dates This Month are the same database. However, the former is filtered to only display important dates in the current week, while the latter is filtered to display all important dates in the current month.)
Also, I’ve added a property called “Course” to this database, so I know which class each assignment or exam is associated with.
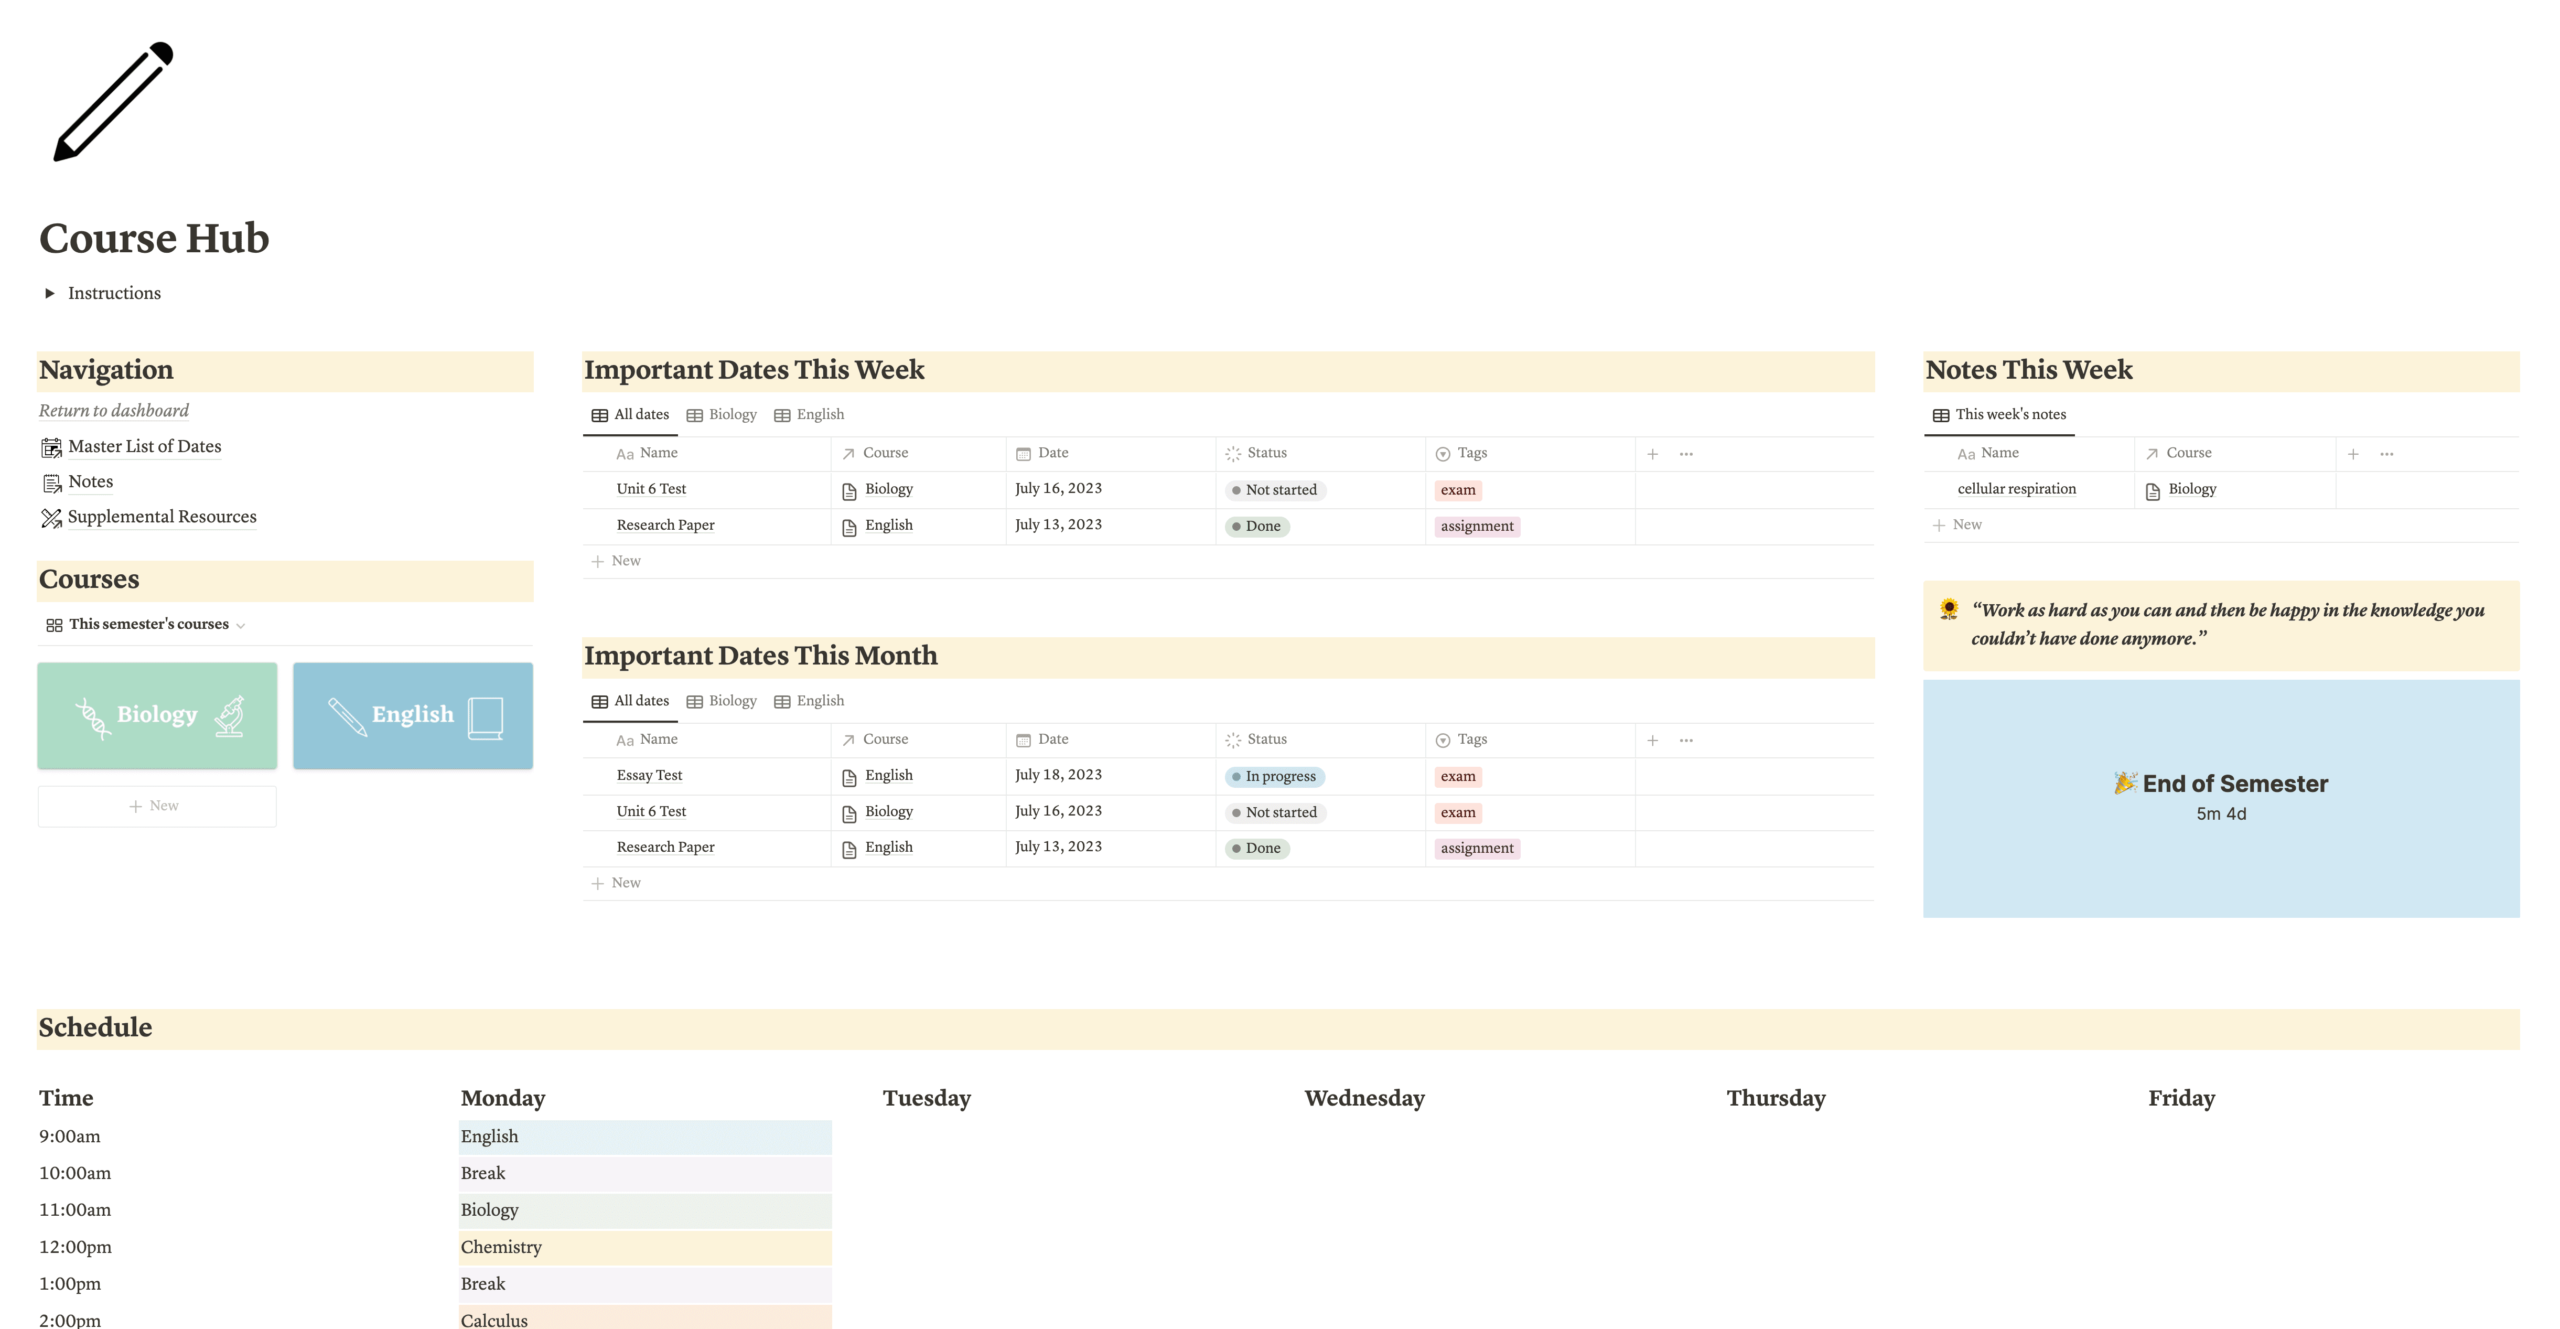
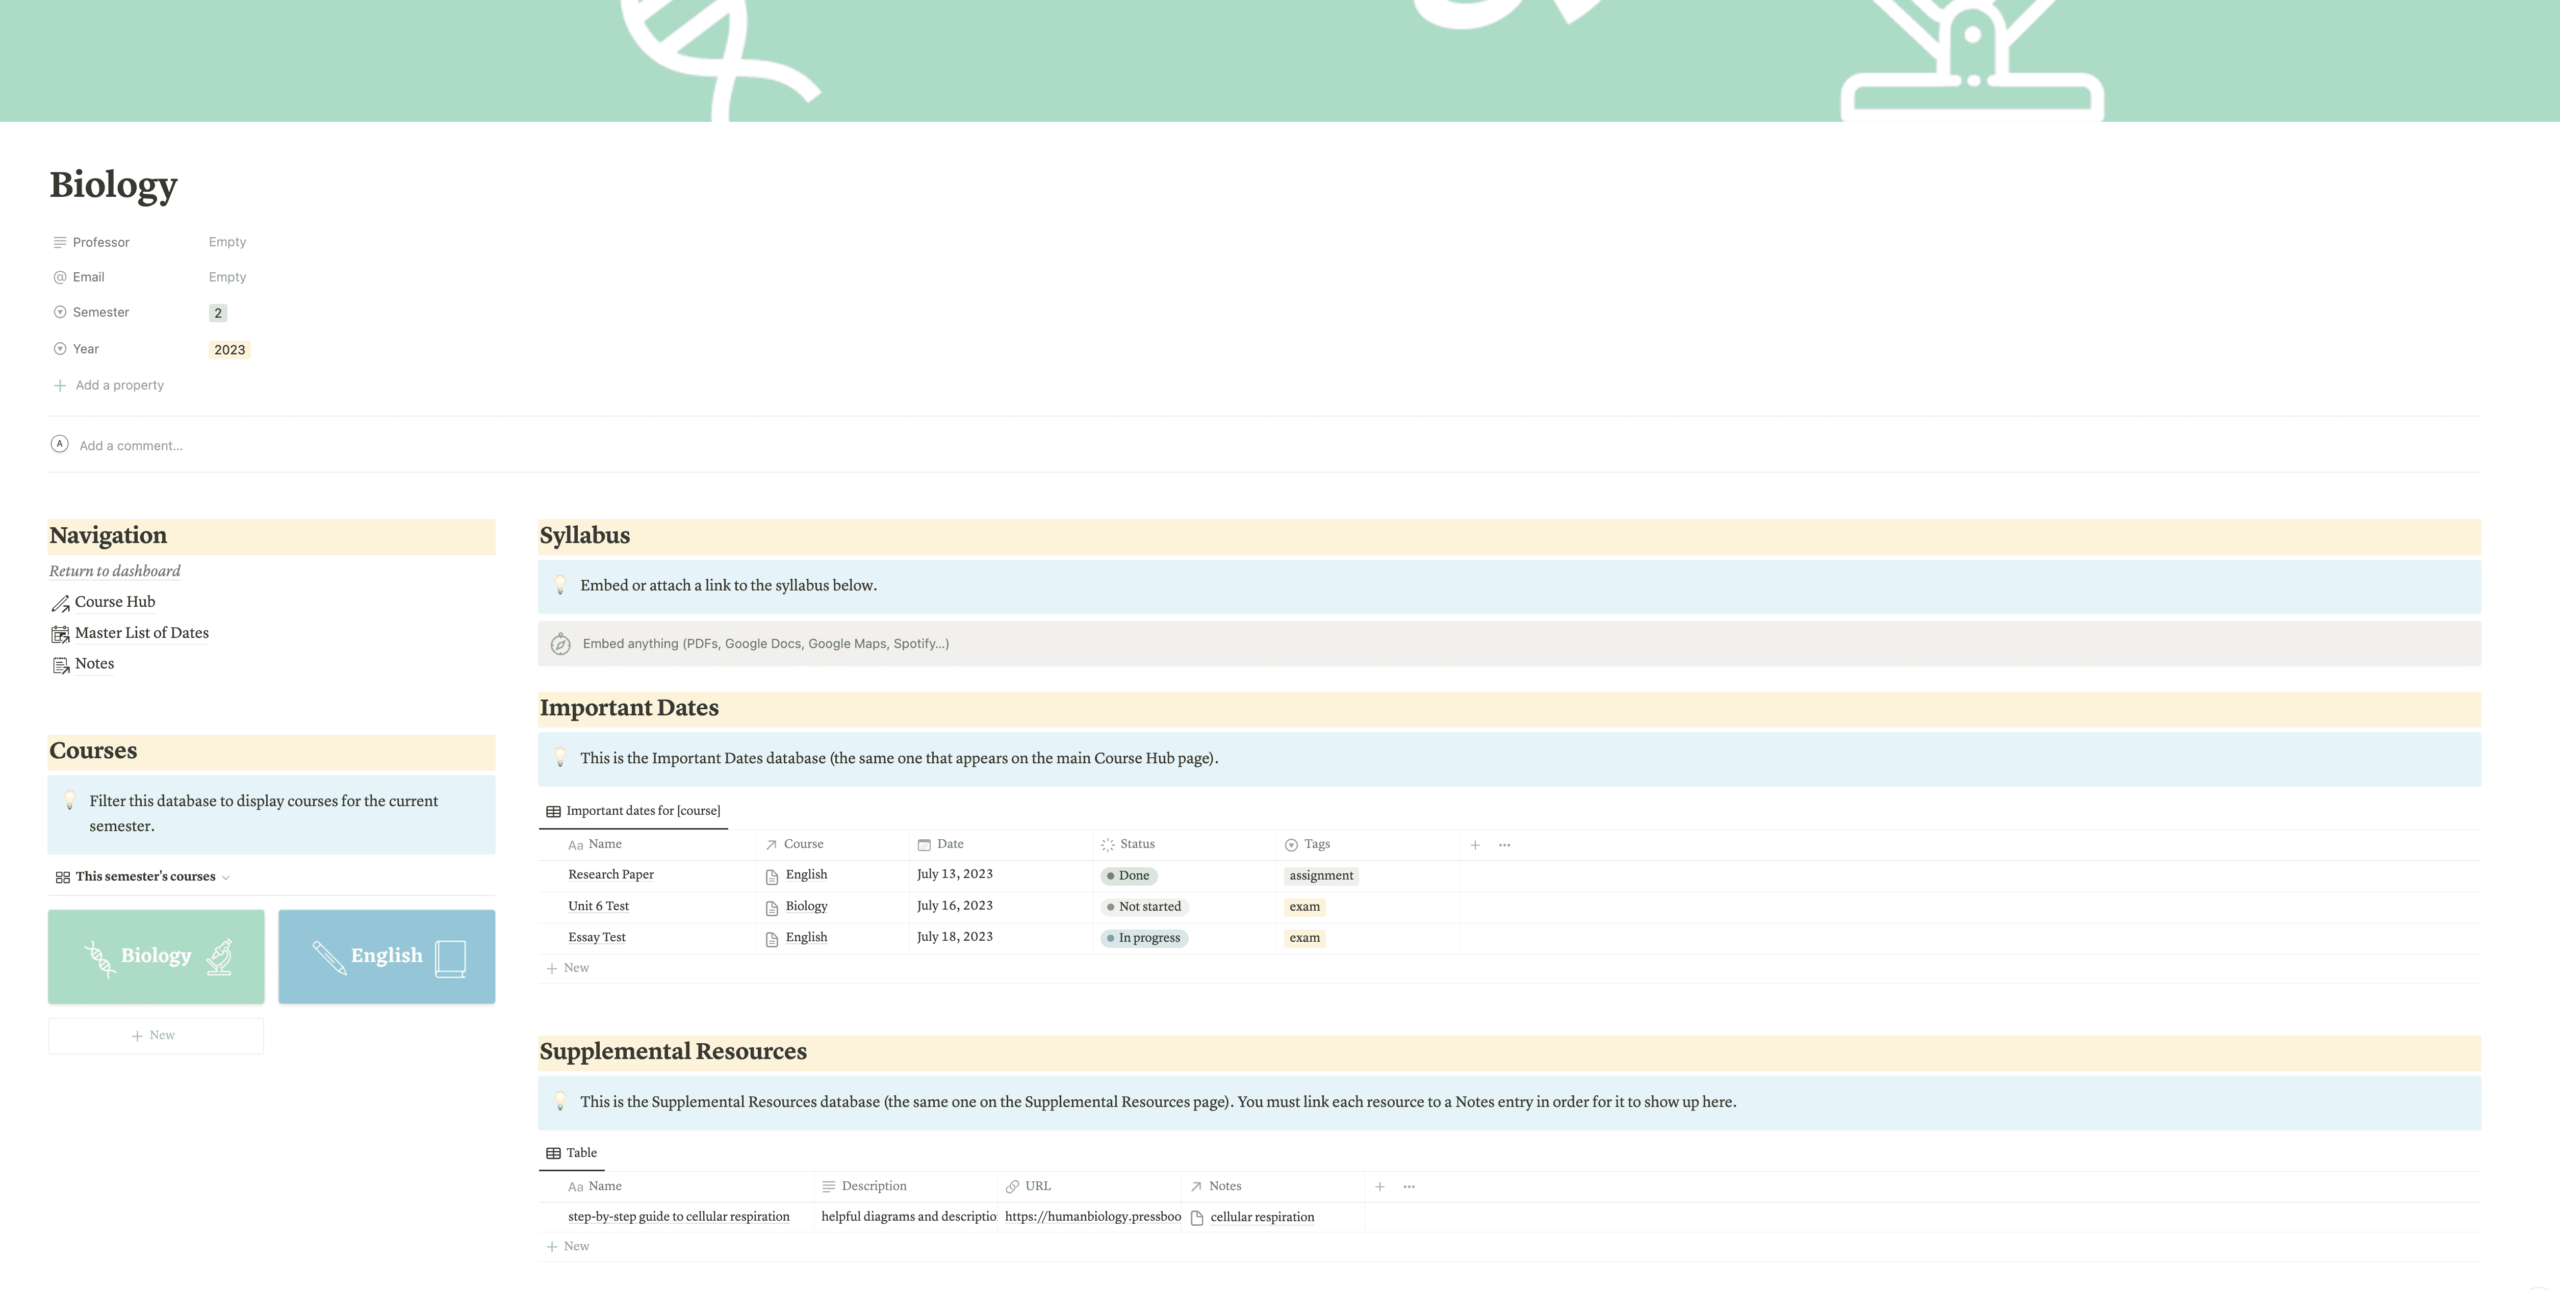
In addition to this database, I have a database called “Courses,” which I’ve set to the Gallery view (to create a Gallery view, just hit backslash and select “Gallery view”).
I also have a database titled “Notes” and another database titled “Supplemental Resources”. The Notes database is filtered to only display notes that I’ve taken in the current week. The Supplemental Resources database is located on the Supplemental Resources page and contains links to helpful course-related materials.
To finish setting the “Courses” database up, create a new entry and open it. In it, you’ll see the option “+ New Template”. By creating a template, you can get the same setup for each new entry with the click of a button.
To configure the template, first set up the properties you would like to be associated with each course. Ideas for properties include:
- Professor name
- Semester
- Year
- Link to syllabus
Once you finish adding the properties, add a view of the “Important Dates” database you created earlier. To do so, hit backslash and select “Table view”. Every time you add a new course, you should filter this database to only display dates specific to that course.
Next, add a view of the “Notes” database and a view of the “Supplemental Resources” database pictured on the main Course Hub page. Again, filter these databases to display entries specific to the course. (Quick Note: The “Notes” database view is not pictured below.)
Finally, you can add a course schedule at the bottom of the Course Hub page. To do so, create a simple column setup.
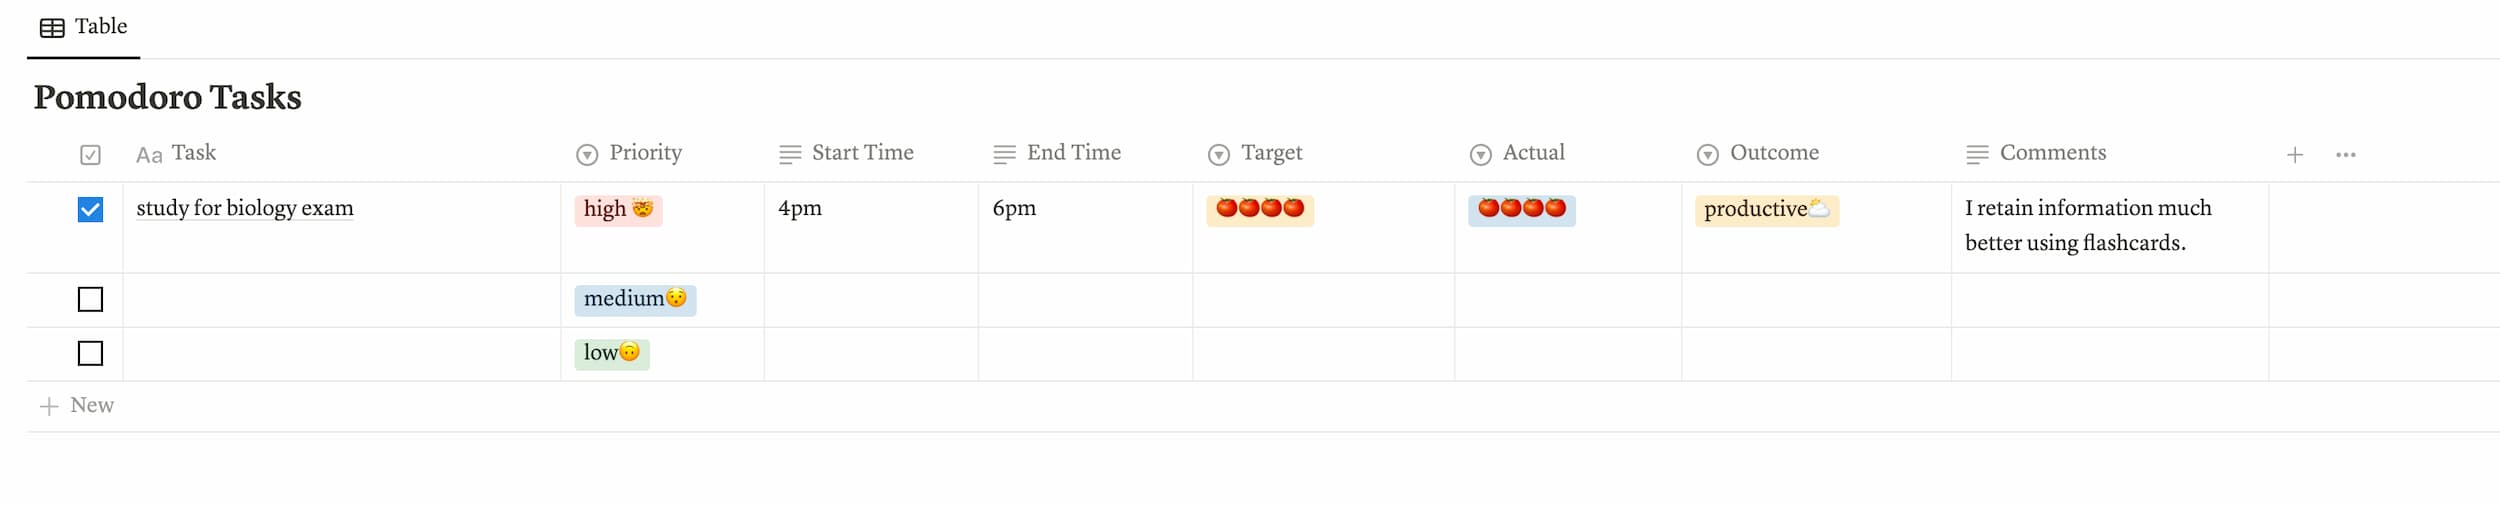
Pomodoro Tracker
If you’re not familiar with the Pomodoro method, it is a simple technique for boosting productivity. Here’s how it works:
- Work in 25-minute segments with 5-minute breaks in between.
- After three to four work sessions, take a longer break of 15-20 minutes.
The Pomodoro method boosts productivity by giving your brain time to recharge. It also provides a sense of urgency because you have to get as much done as you can before the timer goes off.
To maximize the Pomodoro method, you should plan which tasks you want to accomplish within each 25-minute Pomodoro session. As you get used to the Pomodoro method, you’ll get a better understanding of your work pace and be able to optimize your work sessions.
To set up the Pomodoro Tracker page, you need to embed pomofocus.io, which you can do by hitting backslash, selecting “Embed,” and pasting the URL.
Below the embed, set up a Table database to plan and track your Pomodoro sessions.
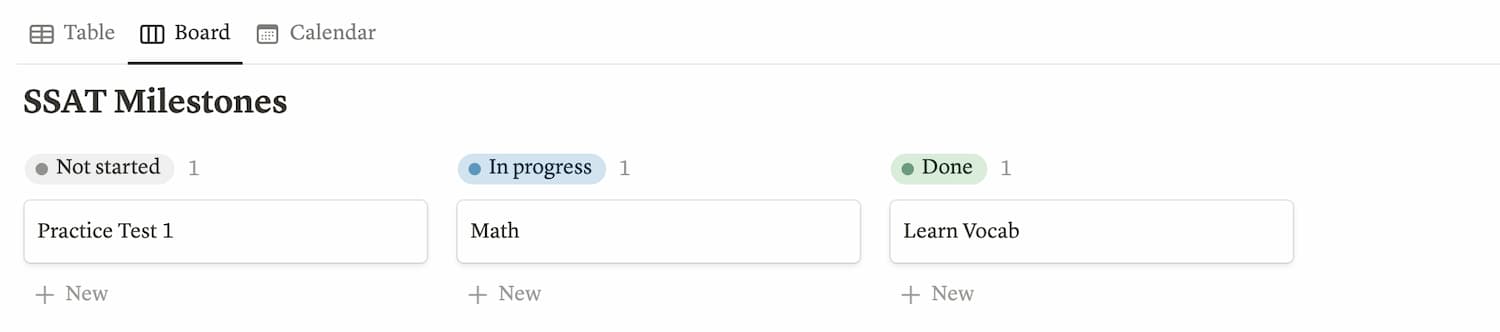
Long-Term Project Tracker
If you have a long-term project you’re working on (whether it be academic-related, health-related, finance-related, etc.), you can stay on top of tasks using a project tracker.
To create a project tracker, create a new page for the project. (The image I’m using is the project tracker I created for my sister’s SSAT prep.)
Then, create a database to organize short-term tasks (SSAT Milestones in the image below). If necessary, create another database to store links to helpful resources (SSAT Notes in the image below).
Finally, you can relate the two databases to one another to see which resources correspond with which tasks.
As you can see, I’ve used the Relation and Rollup properties to relate the SSAT Milestones and SSAT Notes databases to one another.
With the Relation property, I’m able to see which entries from the SSAT Notes database correspond with tasks from the SSAT Milestones database. With the Rollup property, I’m able to see the current learning status for the SSAT Notes entries in the SSAT Milestones database.
Additionally, I’ve created a Board View of the SSAT Milestones database to view progress on each short-term task.
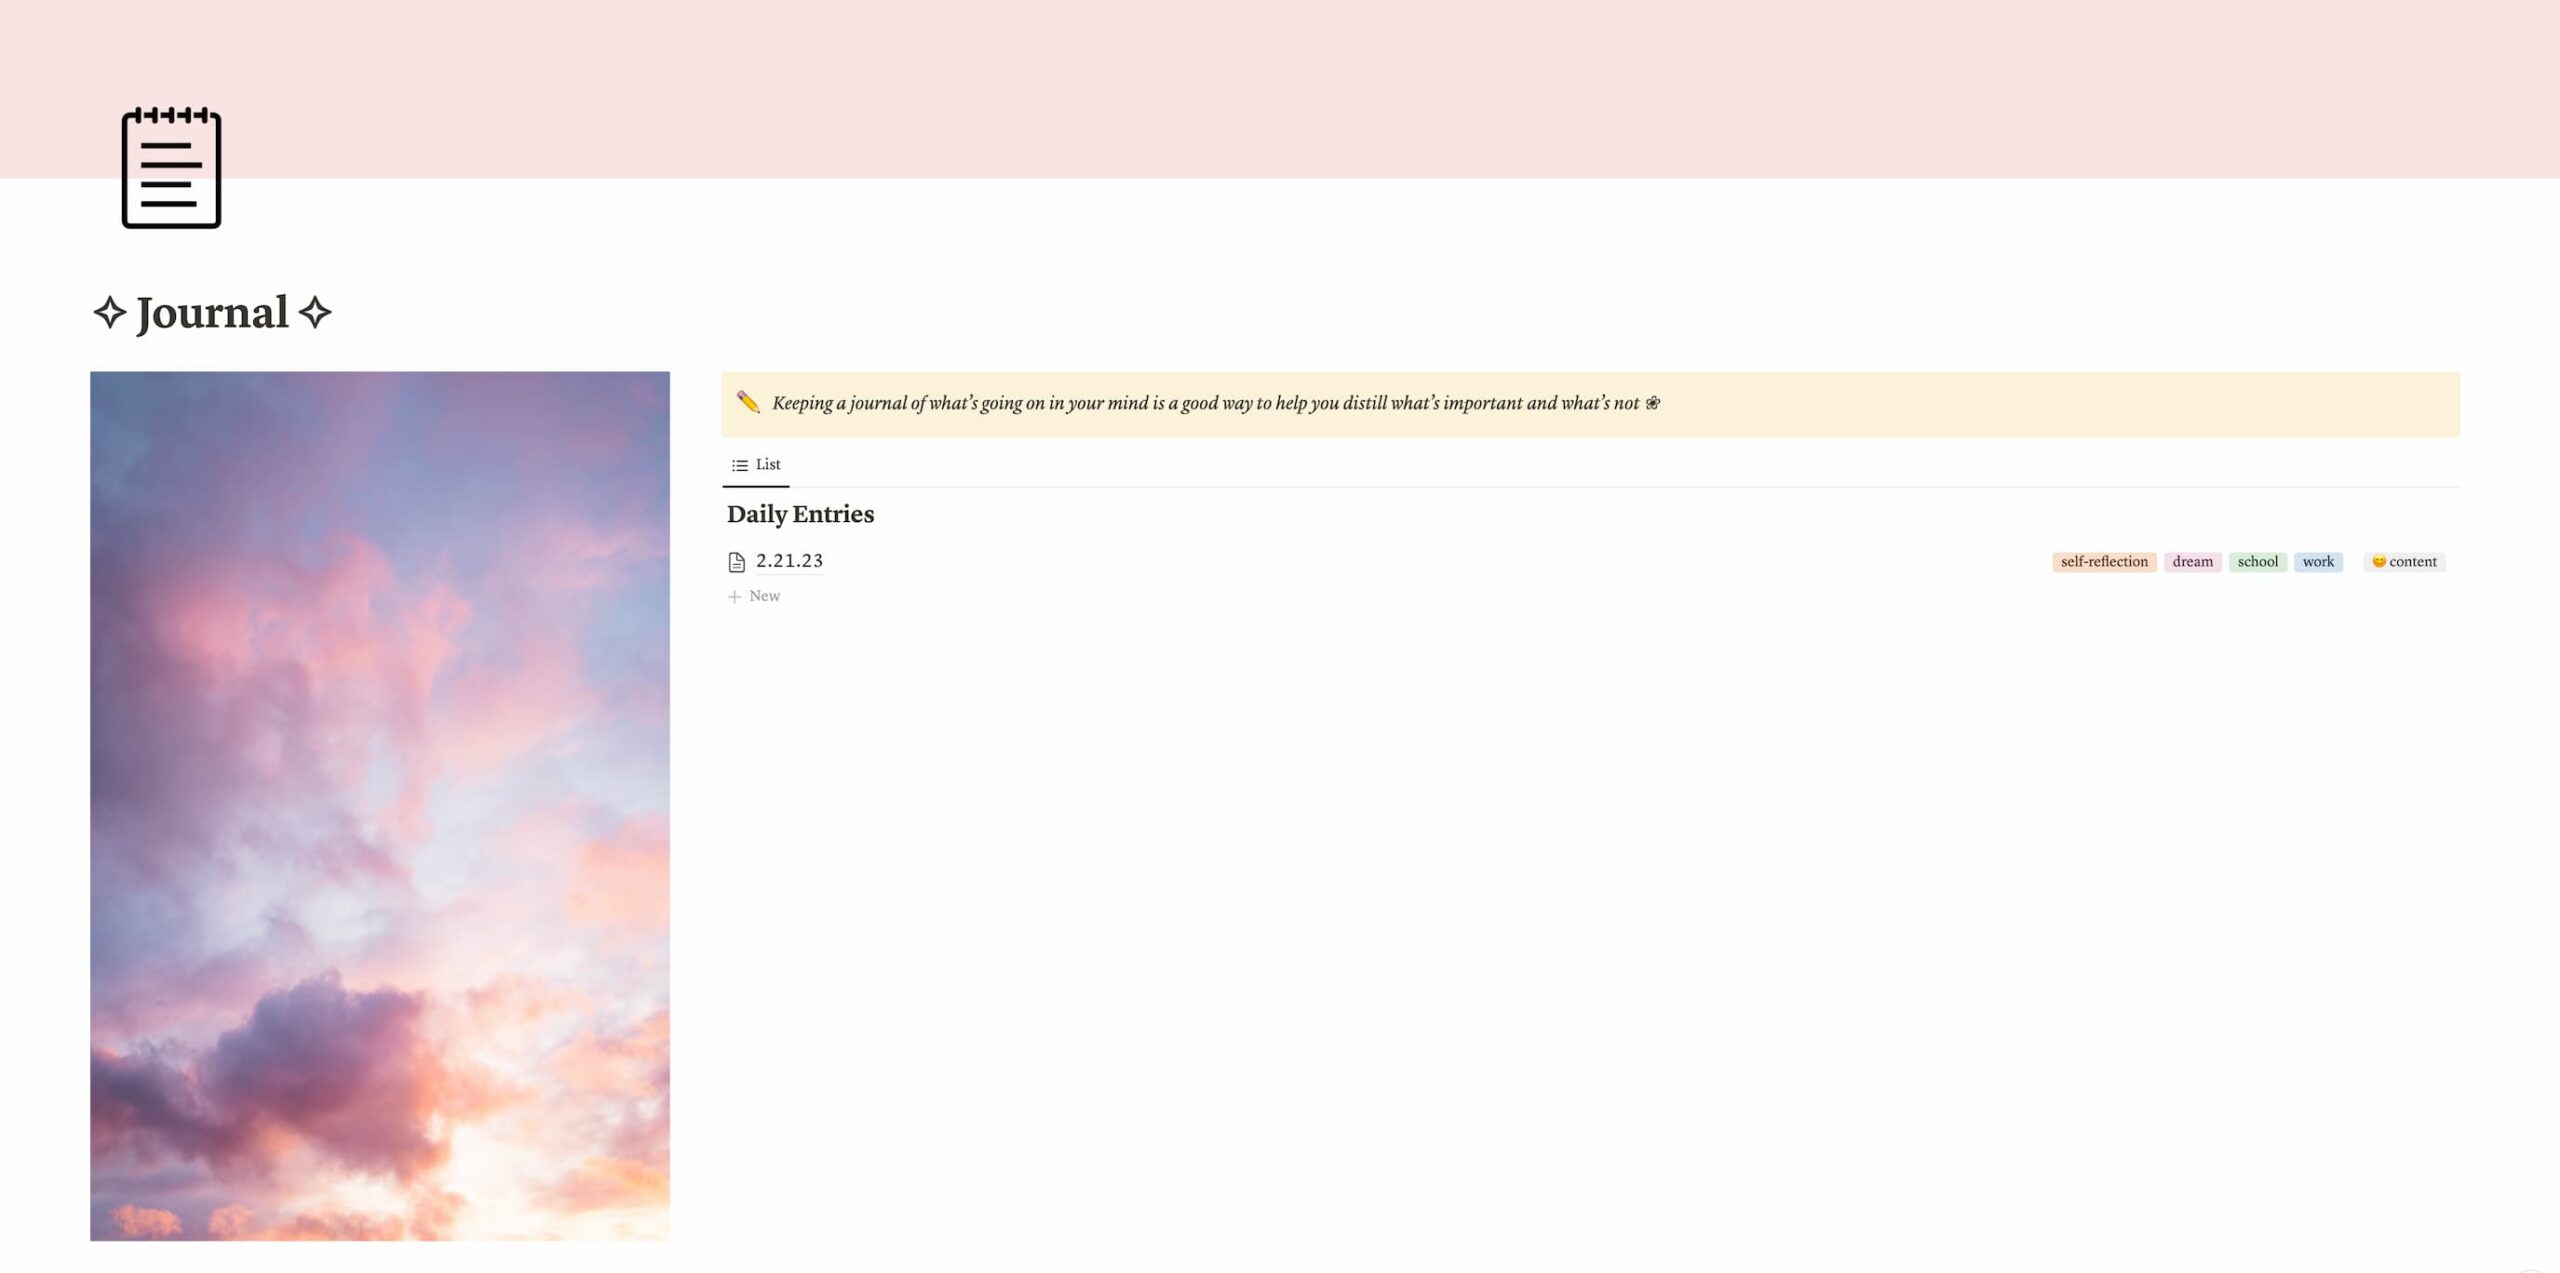
Daily Journal
One of my favorite uses of Notion has been journaling. Journaling facilitates self-growth and provides many mental health benefits.
You can keep your journal setup fairly simple. Create a database to store your journal entries (I’m currently using a List view).
You can add properties to each journal entry, such as a “Tags” property to denote relevant topics for each entry.
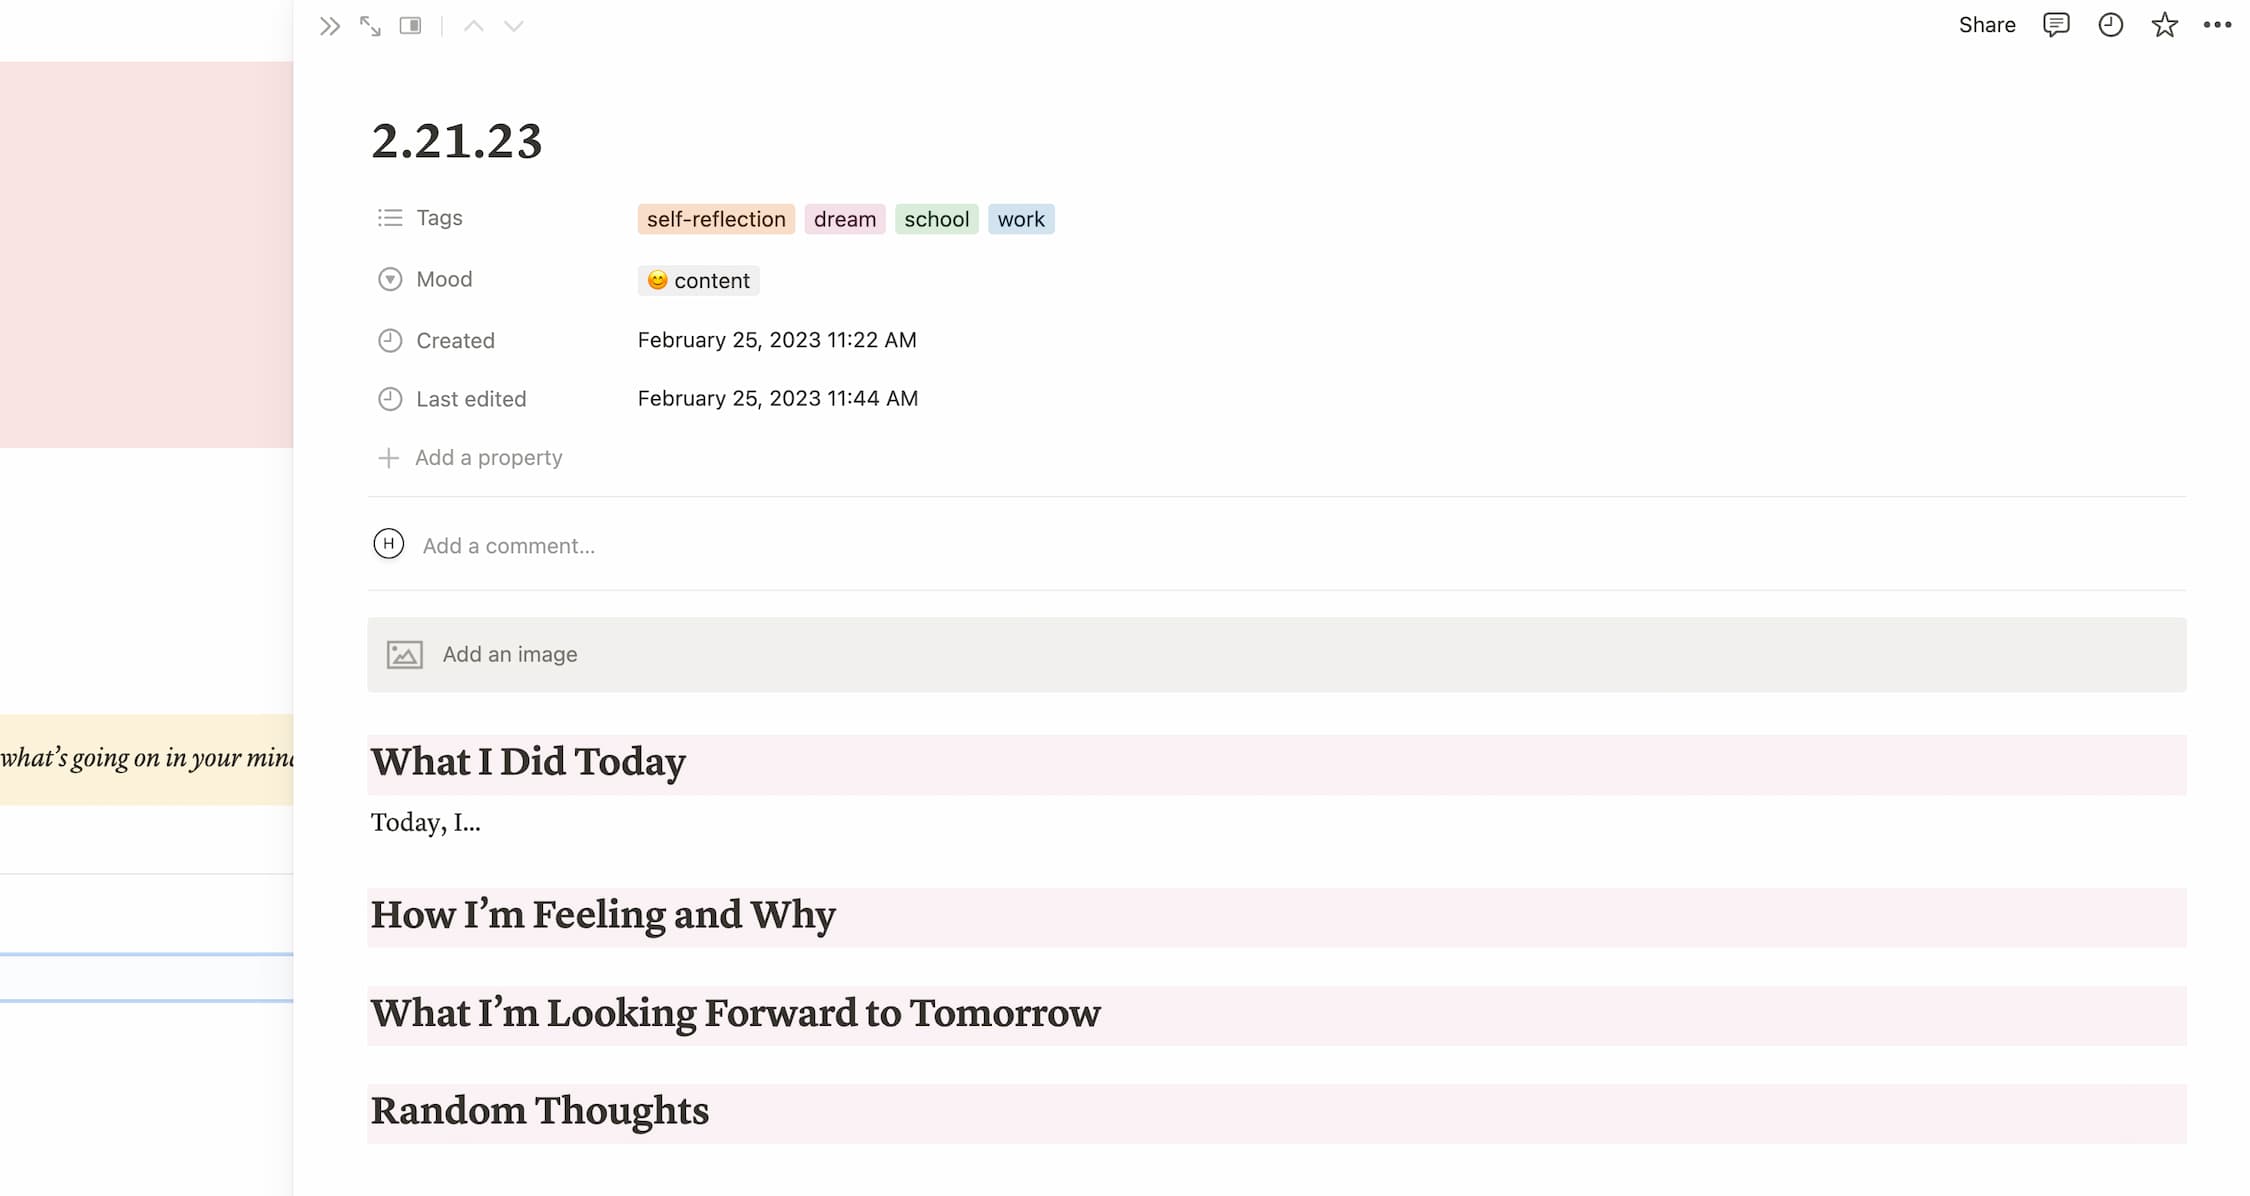
As with the Courses database I covered earlier, you can configure a daily entry template using the “+ New Template” button. This way, you can populate each entry with the journal prompts you want to answer with the click of a button.
Here is the template I’ve set up:
Finances Tracker
To set up your finances tracker, hit backslash and select “Template button”. Then, create a subpage (hit backslash and select the “Page” option).
Set up your template according to your needs. In my template, I’ve created three columns titled “Budget Plan”, “Expected Income”, and “End-of-Month Evaluation”.
Below that, I’ve created another two columns. In the left-hand column, I’ve set up an inline database to track my monthly expenses. In the right-hand column, I’ve set up an inline database to track my monthly income.
Once you’ve configured the page to your liking, head back to the template configuration. Click on the three dots on the right-hand side of the page, then select the “Text” option. Rename the template button to “New Finance Tracker” and you’re done!
Media Library
If you want to track the books you’re reading, podcasts you’re listening to, shows you’re watching, and other types of media, then a Media Library comes in handy.
You can make your Media Library as fancy or as minimalist as you want. For a minimalist setup, follow these steps:
Create a database to store media entries. Add properties like “Status,” “Genre”, “Rating”, and “Date”.
If you like writing a brief reflection for each entry, create a template for database entries.
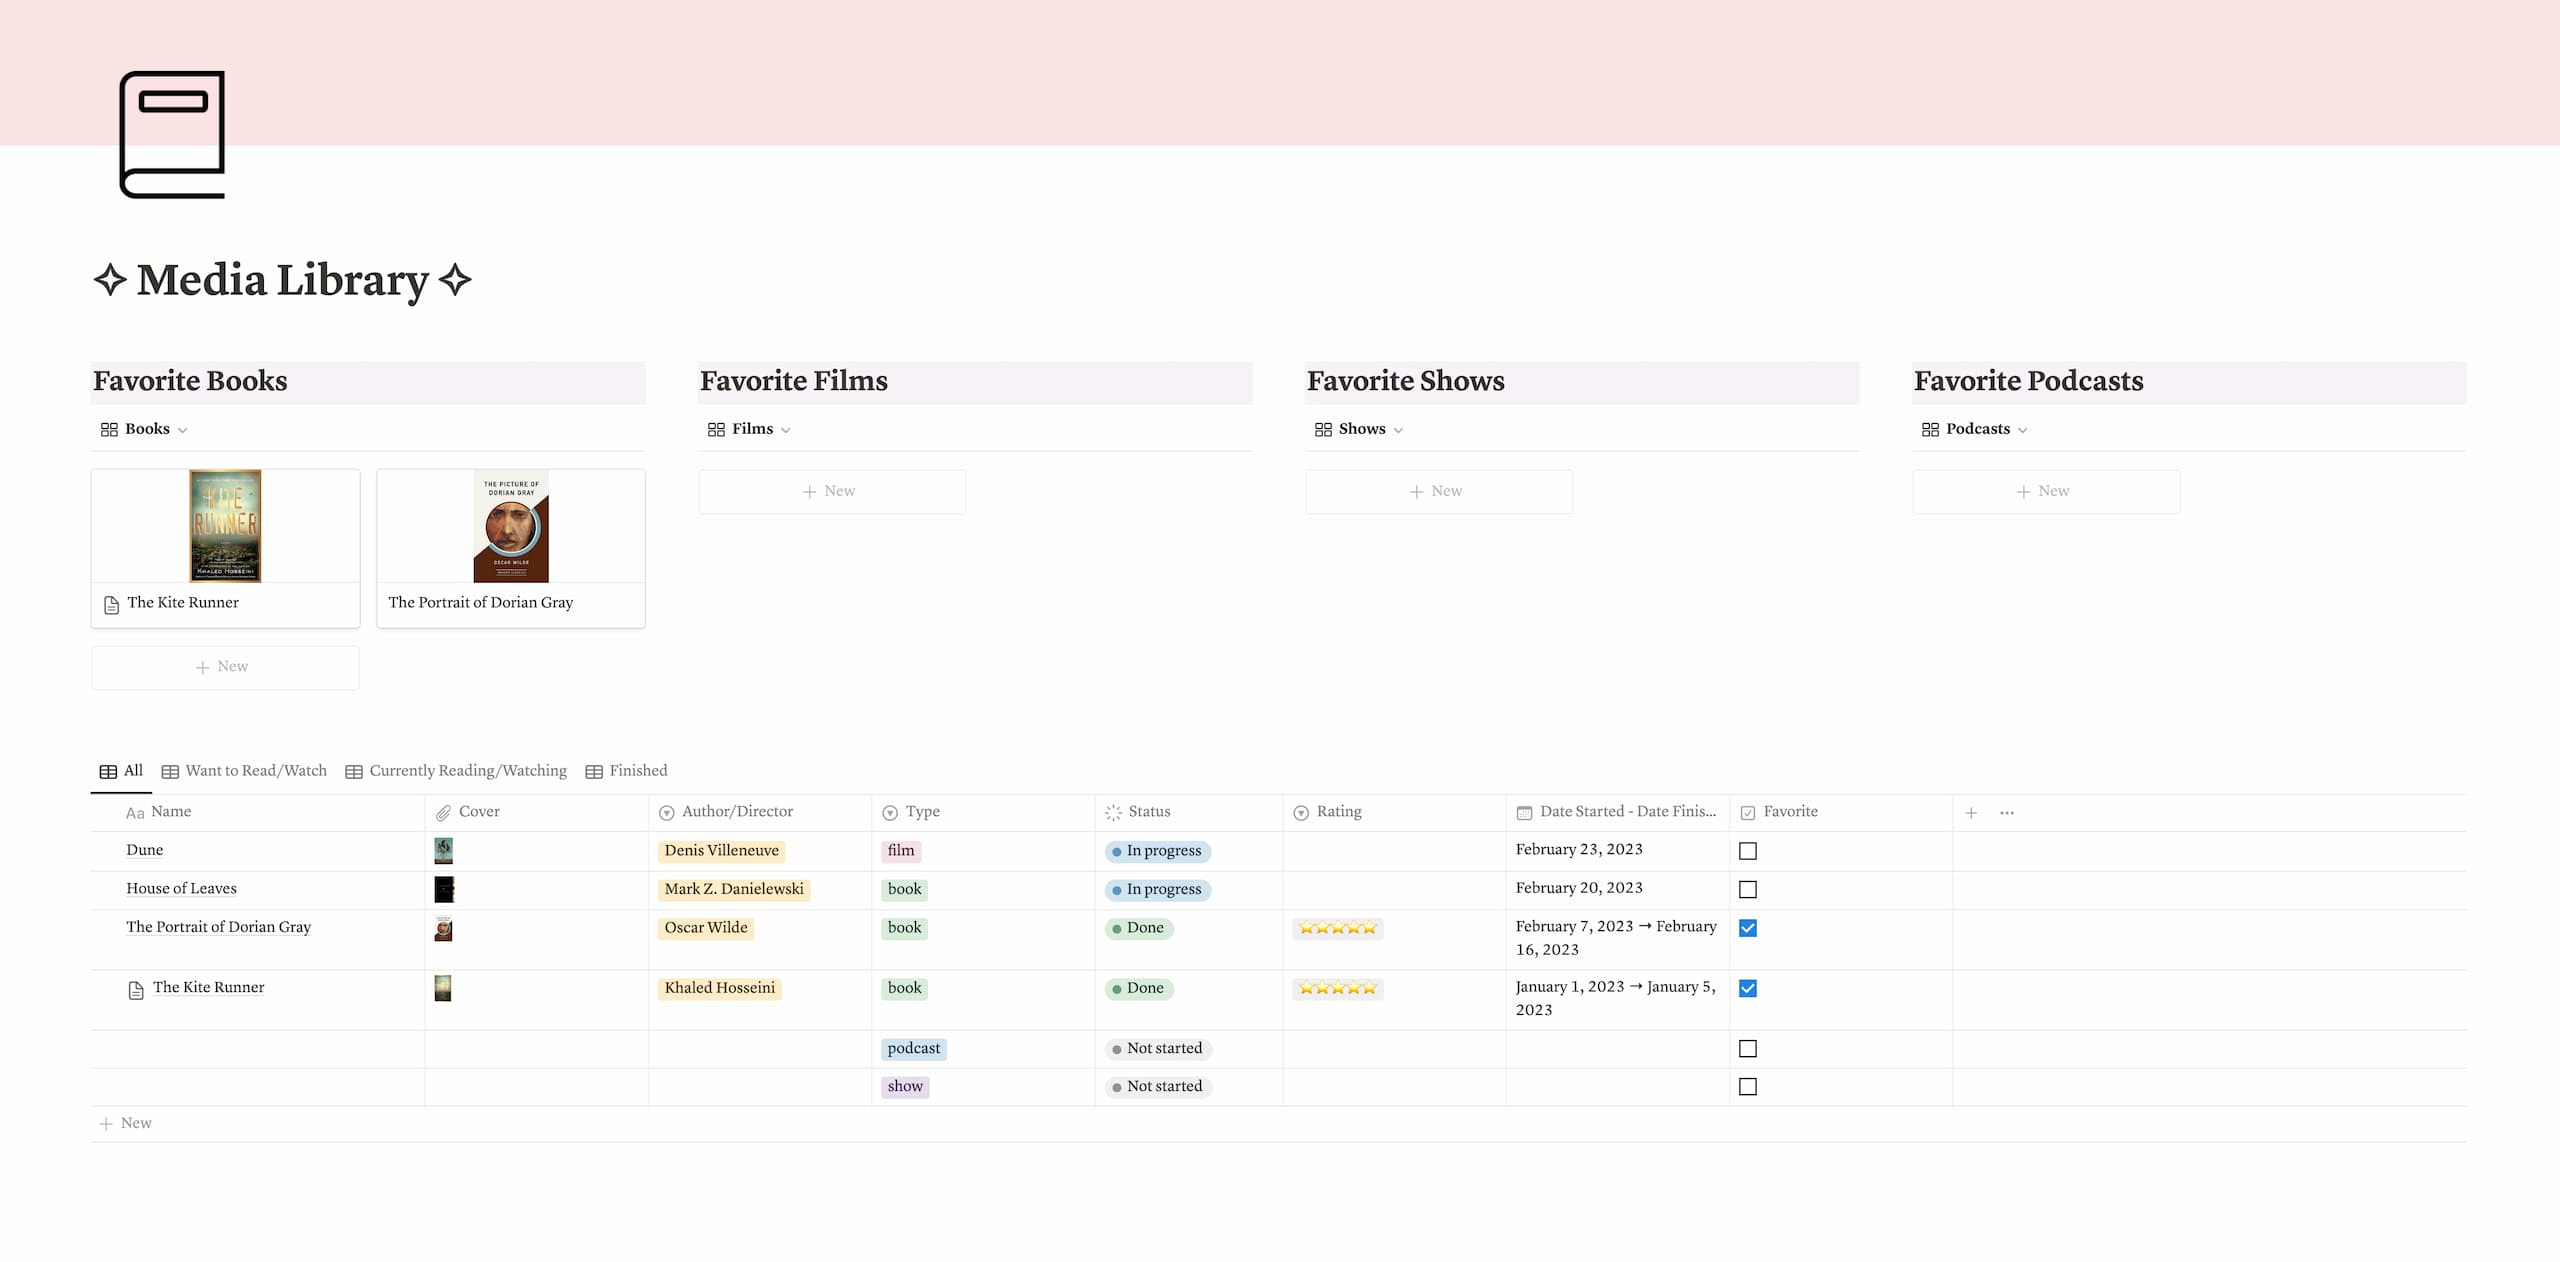
In the Media Library above, I’ve also added gallery views at the top to display media I marked as “favorite” in the current year.
Overview of How to Setup Notion for Students
If you initially found Notion overwhelming, I hope this article gave you a better idea of how you can set up your Notion.
Remember, the easiest way to get started with Notion is to dive right in. Play around with the different features, and you’ll become familiar with them in no time. There’s a reason why Notion is so popular—it’s easy to use, flexible, and powerful for organization and planning.
And as promised, I’ve created a free Notion student setup you can start using right now. All you need to do is enter your email address in the form below. You’ll receive a link to the template in your email immediately.
If this post gave you the final push you needed to create your Notion student setup, let me know in the comments below! Also, if you have questions about anything covered in this post, feel free to let me know.
For more posts on Notion and productivity, check out:
- All-in-One Aesthetic Planner App for Students
- How To Create An Aesthetic Notion Setup With Zero Experience
- 5 Ways to Increase Attention Span While Studying Immediately
- Morning to Night Routine for Students to Boost Productivity
- 9 Guaranteed Ways to Overcome Procrastination for Students
- Productive Day Schedule For Students—Be Productive 12+ Hours a Day!


cool!
This was really helpful and made notion less overwhelming!
Thank you for the tutorial!